
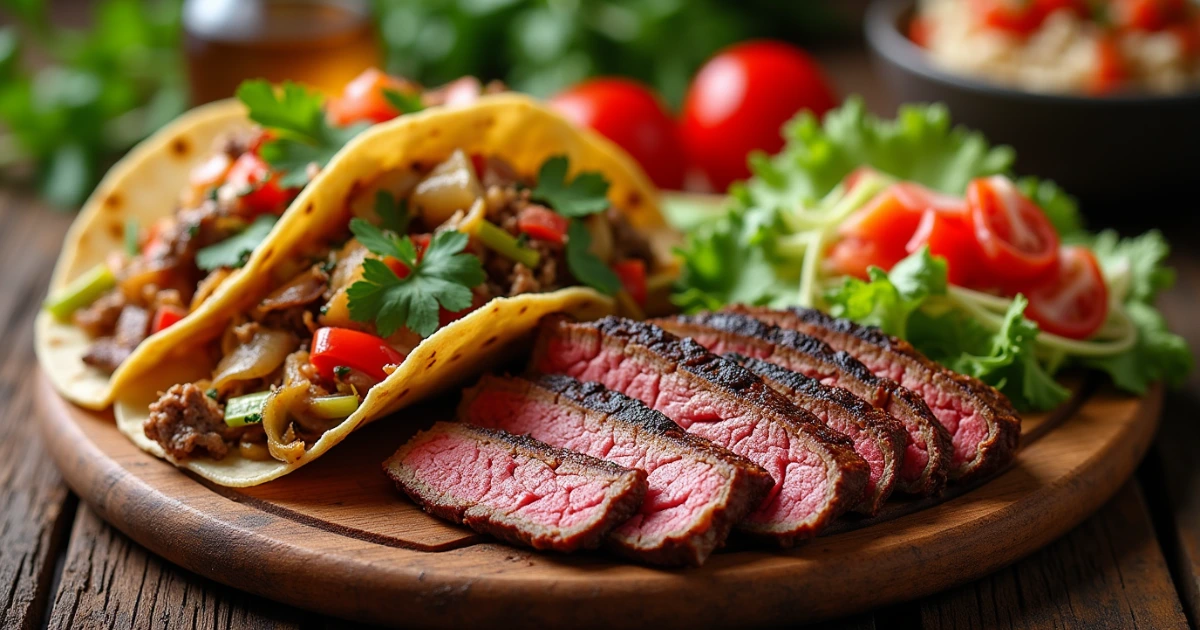
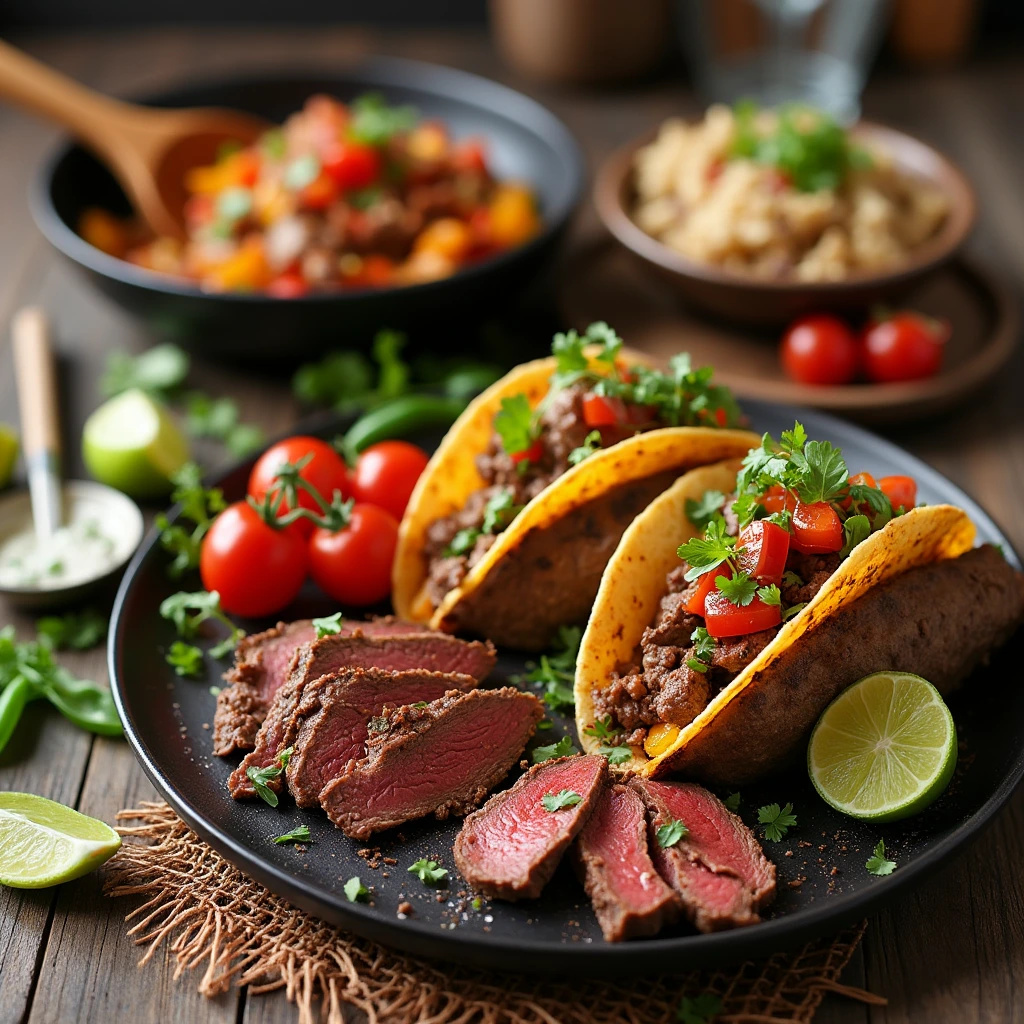
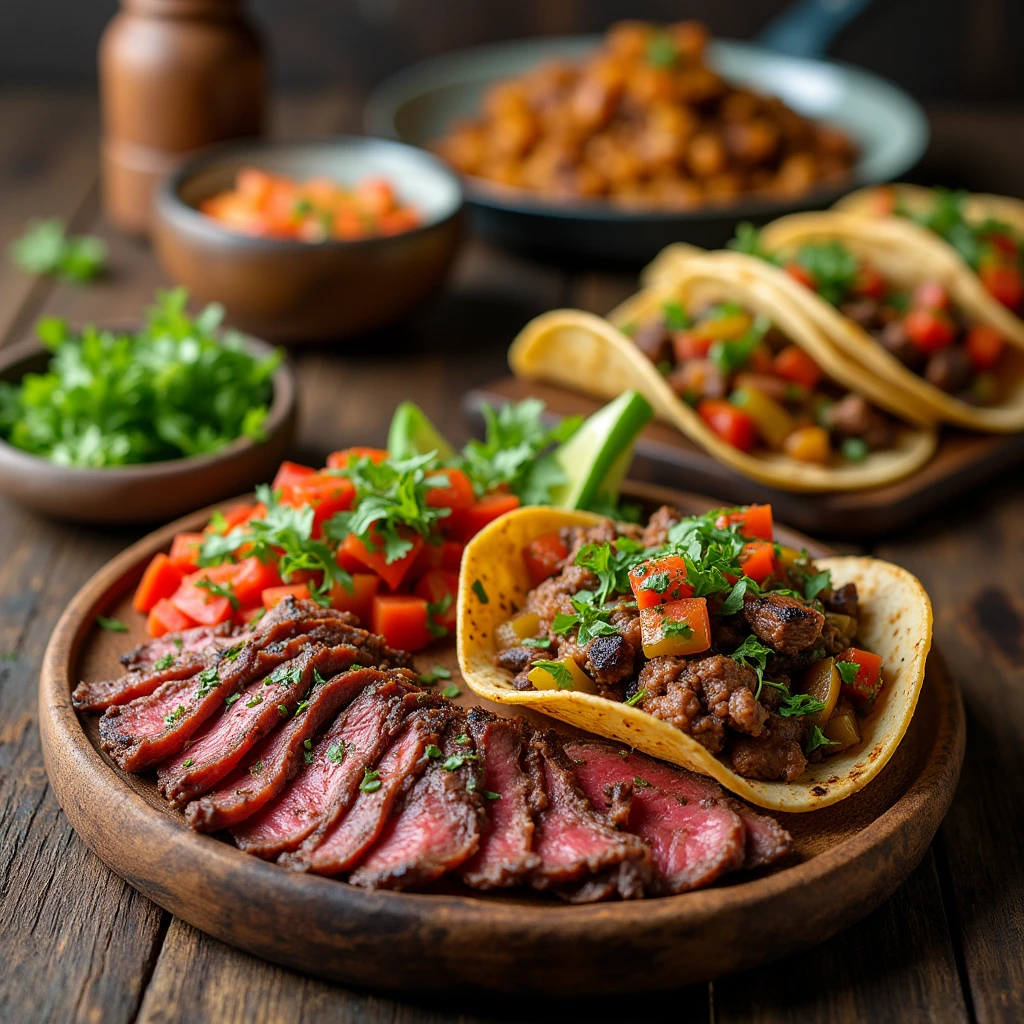
How to Make the Best Thin Sliced Beef Recipes at Home
Thin-sliced beef is more than just a quick cooking option—it’s the key to creating mouthwatering meals that are bursting with flavor. With its tender texture and versatility, this ingredient can easily adapt to a variety of cuisines and recipes, from Asian-inspired stir-fries to classic grilled dishes. Whether you’re in the mood for a savory rice bowl, a juicy skillet recipe, or a hearty wrap, thin-sliced beef makes it all possible with minimal effort.
What makes thin-sliced beef so special? Its ability to absorb marinades and seasonings quickly ensures every bite is packed with flavor. Plus, its quick cooking time makes it ideal for busy weeknights, meal prepping, or last-minute dinner ideas. With the right cut, proper slicing techniques, and a few cooking tips, you can elevate your home-cooked meals and impress family or guests alike.
In this post, we’ll walk you through the essential steps for choosing the best cuts of beef, mastering the art of slicing, and using foolproof marinades and seasonings. You’ll also find easy, delicious recipes to make at home that highlight the versatility of thin-sliced beef. Get ready to take your cooking to the next level—let’s explore the endless possibilities of thin-sliced beef recipes!
Choosing the Best Cut of Beef for Thin Slicing
Types of Cuts to Use
When it comes to thin-sliced beef, the cut of meat you choose plays a huge role in the final dish. Some cuts are more tender and flavorful when sliced thin, while others may be tougher and require more care in preparation. Here are some of the best cuts of beef for thin slicing, each with its own unique qualities that make them ideal for quick and delicious meals:
1. Ribeye
Ribeye is one of the most tender and flavorful cuts of beef, making it a top choice for thin slicing. Known for its marbling of fat, ribeye is juicy and flavorful, delivering a rich taste that shines in stir-fries or quick sears. When sliced thinly against the grain, it cooks quickly while maintaining its tenderness. Ribeye slices work wonderfully in dishes like beef stir-fry or tacos.
2. Sirloin
Sirloin is a leaner cut, but still tender enough for thin slicing. It’s less fatty than ribeye but still offers plenty of flavor. Sirloin is versatile and can be used in a wide range of dishes, from beef and vegetable stir-fries to hearty salads. It’s an affordable option that still delivers a satisfying bite when sliced thinly.
3. Flank Steak
Flank steak is a popular choice for thin-slicing, especially in dishes like fajitas and stir-fries. This cut comes from the lower abdomen of the cow, and while it’s not as tender as ribeye or sirloin, it’s still great for quick cooking when sliced properly. Flank steak should be sliced against the grain to help break down its fibers and ensure tenderness. It also takes marinades well, making it perfect for dishes that rely on bold, savory flavors.
4. Tenderloin
Tenderloin is, as the name suggests, one of the most tender cuts of beef available. Though it can be on the pricier side, it’s perfect for dishes where tenderness is key. Tenderloin slices are incredibly soft, making them great for dishes like steak sandwiches or gourmet stir-fries. Because of its tenderness, this cut requires less cooking time and is ideal for quick, high-heat cooking methods.
5. Skirt Steak
Skirt steak is similar to flank steak but has a slightly more pronounced beefy flavor. Like flank steak, skirt steak should be sliced against the grain to help break up its tougher fibers. This cut is often used in Mexican cuisine, such as in fajitas, but also works beautifully in stir-fries and even grilled beef dishes. Skirt steak is flavorful and holds up well to marinades, which makes it a great option for enhancing the overall taste of your thin-sliced beef dishes.
6. Top Round
Top round, a cut from the rear leg of the cow, is another leaner option that’s great for thin slicing. It’s less tender than ribeye or tenderloin, but when sliced very thin and cooked quickly, it can be quite flavorful. Top round works well in dishes like beef sandwiches, stir-fries, or even as a filling for wraps. It’s an affordable choice for those on a budget but still seeking a satisfying beef dish.
Each of these cuts offers a different flavor profile and texture, but they all work beautifully when sliced thinly. Be sure to choose the right cut based on your desired outcome—whether you’re looking for richness, tenderness, or a more budget-friendly option. The key to a great thin-sliced beef dish is not just the cut but also how you prepare and cook it. By choosing the right cut and slicing against the grain, you can achieve tender, juicy results every time.
Why Thin Slicing Matters
Thin slicing beef is a technique that significantly enhances the texture, flavor, and cooking efficiency of the meat. Whether you’re working with a tender cut like ribeye or a leaner cut like flank steak, slicing the beef thinly makes a world of difference in the final dish. Let’s explore why thin slicing matters and how it can elevate your cooking.
1. Faster Cooking Time
Thin slices of beef cook much faster than thicker cuts, making them perfect for quick meals, busy weeknights, or meal prepping. Because the slices are thinner, they cook through more quickly and evenly, preventing overcooking or dryness. This is especially important in stir-fries, fajitas, or any dish that requires high-heat cooking in a short amount of time. With thin-sliced beef, you can have a flavorful, tender meal ready in minutes.
2. Enhanced Tenderness
Thin slicing beef is a simple way to ensure that tougher cuts, such as flank steak or top round, remain tender. By cutting against the grain of the meat, you shorten the muscle fibers, which makes the beef easier to chew and more enjoyable to eat. This technique helps break down tougher tissues in the meat, giving you a softer, more delicate texture without the need for lengthy marinating or tenderizing processes.
3. Better Flavor Absorption
One of the biggest benefits of thin slicing is that it allows marinades, seasonings, and sauces to penetrate the meat more effectively. Since the surface area of each slice is larger, the beef can absorb more flavor in less time. Whether you’re using a soy-based marinade, a garlic and herb rub, or a spicy marinade, thin slices ensure that every piece of beef is infused with the flavor, making each bite incredibly tasty. This quick absorption is key to creating dishes like teriyaki beef, stir-fry, or beef skewers, where bold flavors are crucial.
4. Versatility in Cooking Methods
Thin-sliced beef opens up a range of cooking possibilities that wouldn’t work as well with thicker cuts. For example, you can quickly sear beef in a hot skillet for a crispy exterior while keeping the inside juicy. Thin slices are also ideal for grilling, stir-frying, or even making beef tacos and sandwiches. The versatility of thin-sliced beef allows you to experiment with different cooking methods, from fast stir-fries to slow braises (though typically not needed for thin-sliced beef).
5. Portion Control and Presentation
Thin slicing helps with portion control, as you can use a smaller amount of beef for each serving while still creating a satisfying dish. This is particularly helpful for dishes like beef salads, sandwiches, or rice bowls, where you want the beef to stretch further without compromising on flavor. Additionally, thin slices present beautifully on a plate, giving your dish a delicate, professional appearance. Whether you’re serving a family meal or preparing food for guests, thin-sliced beef offers an elegant touch to your dishes.
6. Increased Yield from Each Cut
Thin slicing increases the yield you get from each piece of meat. By cutting it into thinner slices, you stretch the amount of beef across more servings, which is ideal for both meal planning and feeding a larger group. This can be especially important for budget-conscious cooks looking to maximize their ingredients and make the most out of each cut of beef.
Thin slicing isn’t just a cooking technique—it’s a game-changer that can enhance the tenderness, flavor, and versatility of beef. By mastering this method, you’ll be able to elevate any beef dish, whether you’re preparing a stir-fry, grilling slices for tacos, or making a gourmet beef sandwich. The beauty of thin-sliced beef lies in its ability to cook quickly, absorb flavors, and create tender, juicy results every time.
How to Slice Beef Thinly at Home
Slicing beef thinly at home might seem challenging at first, but with the right technique and tools, it’s an easy process that can enhance your cooking. Whether you’re preparing thin slices for stir-fries, fajitas, or beef sandwiches, following these simple steps will ensure that your beef is sliced perfectly every time. Here’s how to get those beautifully thin, uniform slices:
1. Choose the Right Cut of Beef
Before you begin slicing, it’s important to choose the right cut of beef. As we discussed earlier, cuts like ribeye, sirloin, flank steak, and tenderloin are ideal for thin slicing. These cuts are tender enough to maintain a nice texture when sliced thin but still flavorful. Leaner cuts, like flank steak, may require a little more attention to slicing technique to ensure they remain tender.
2. Chill the Beef Before Slicing
One of the best tips for cutting thin slices of beef is to slightly chill the meat before you slice it. Freezing it for about 15–30 minutes will firm it up, making it much easier to slice. The beef will be more solid and less prone to tearing when you cut it, allowing you to achieve those perfect, uniform slices. If you’re in a rush, you can even use a meat freezer or a cold place in your kitchen, but avoid freezing the meat for too long, as it can become too hard to cut.
3. Use a Sharp Knife
A sharp, high-quality knife is essential for thin slicing. A dull knife will crush and tear the meat, rather than slice it cleanly, which can lead to uneven pieces and an undesirable texture. A chef’s knife or a slicing knife with a long, thin blade is ideal for this task. A serrated knife can also work well, especially when cutting through tougher cuts. Be sure to maintain your knife’s sharpness by honing it regularly to achieve clean cuts every time.
4. Slice Against the Grain
To achieve the best texture and tenderness, it’s important to slice against the grain of the meat. The “grain” refers to the direction of the muscle fibers, which run along the length of the meat. By cutting against the grain (perpendicular to the muscle fibers), you shorten the fibers and make the meat much easier to chew. Slicing against the grain is the key to unlocking tenderness, especially in tougher cuts like flank steak or sirloin.
5. Maintain Even Thickness
Consistency in slice thickness is important for even cooking. Aim for slices that are no thicker than 1/4 inch, depending on your recipe. Thicker slices will take longer to cook and may not absorb marinades as effectively, while thinner slices will cook quickly and evenly. Use your knife to carefully control the thickness of each slice, and try to keep them as uniform as possible. If you have trouble with this, you can also use a meat slicer, which is especially useful for large batches of beef.
6. Slice in a Slightly Frozen State (Optional)
For cuts that are a bit tougher or more fibrous, freezing the meat slightly (without fully freezing it) can make it easier to slice thinly. When the beef is firm, it’s easier to get precise, clean cuts without the meat tearing or squishing. If you have the time, freezing for 15–30 minutes is perfect for achieving this effect. Just ensure that the meat isn’t frozen solid—this would make it difficult to slice.
7. Cutting on a Stable Surface
To ensure safety and precision, always slice your beef on a stable, flat cutting board. Use a non-slip mat or towel underneath the cutting board if needed to keep it steady. This will prevent any accidents and give you more control over your knife. Additionally, make sure the cutting board is large enough to accommodate the entire piece of beef comfortably.
8. Consider Using a Meat Slicer
If you plan to slice beef frequently or in larger quantities, investing in a meat slicer can make the process much easier and more efficient. A meat slicer allows for even, consistent slices without the effort of using a knife. These slicers are especially useful for larger cuts like roasts, where you need a higher volume of thin slices. They come with adjustable thickness settings, giving you control over the exact thickness of your slices.
Pro Tip: If you’re looking for even more uniformity, you can also freeze your beef slightly before slicing. This technique helps to firm the meat, making it much easier to cut thinner, cleaner slices.
By following these simple steps, you can easily slice beef thinly at home without any special tools or skills. Once you master the technique, you’ll be able to make perfect thin-sliced beef for all your favorite recipes, from stir-fries to wraps. Whether you’re cooking for yourself or impressing guests, this easy technique will help you create delicious dishes every time.
Essential Marinades and Seasonings for Thin-Sliced Beef
Classic Marinades for Thin-Sliced Beef
Marinating beef is an excellent way to enhance its flavor, tenderness, and juiciness, especially when using thin-sliced cuts. A good marinade helps infuse the beef with rich flavors, ensuring each slice is perfectly seasoned and delicious. The right combination of acids, oils, and seasonings can transform even the leanest cuts into a tender, flavorful dish. Let’s dive into some classic marinades that work wonderfully with thin-sliced beef.
1. Soy Sauce and Garlic Marinade
A classic soy sauce and garlic marinade is a go-to for many beef dishes, including stir-fries, grilled beef, and fajitas. The soy sauce adds saltiness and umami, while garlic brings a fragrant depth of flavor. This simple yet powerful marinade also helps tenderize the beef, as soy sauce contains natural enzymes that break down the meat’s fibers.
Ingredients:
- 1/4 cup soy sauce
- 2 tbsp olive oil
- 3 cloves garlic, minced
- 1 tbsp brown sugar (optional for a touch of sweetness)
- 1 tbsp rice vinegar or lemon juice (to balance the richness)
- Freshly ground black pepper, to taste
How it works: The soy sauce offers salt and umami, while the garlic adds a savory punch. The oil helps coat the beef for a smooth texture, and the vinegar or lemon juice provides a bit of tang to balance the richness.
2. Teriyaki Marinade
Teriyaki is another classic marinade that pairs beautifully with thin-sliced beef. Its sweet, savory flavor profile comes from soy sauce, brown sugar, and spices. The sweetness of the sugar helps caramelize the beef when grilled or seared, creating a rich, glossy finish.
Ingredients:
- 1/4 cup soy sauce
- 2 tbsp mirin or rice vinegar
- 2 tbsp brown sugar or honey
- 1 tbsp grated ginger
- 1 clove garlic, minced
- 1 tbsp sesame oil
- 1 tsp cornstarch (optional, for thickening)
How it works: Teriyaki sauce is sweet, savory, and slightly tangy, with the soy sauce and mirin providing a rich depth of flavor. The sugar caramelizes beautifully, making it perfect for grilling or stir-frying thin-sliced beef.
3. Lemon and Herb Marinade
For a fresh, light marinade, a lemon and herb mixture is perfect. The acidity from the lemon helps tenderize the beef, while fresh herbs like rosemary, thyme, and parsley infuse the meat with a vibrant, aromatic flavor. This marinade is ideal for leaner cuts like flank steak or sirloin, where a bright, zesty profile complements the meat’s natural taste.
Ingredients:
- Juice of 1 lemon
- 2 tbsp olive oil
- 2 cloves garlic, minced
- 1 tsp fresh rosemary, chopped
- 1 tsp fresh thyme, chopped
- 1 tbsp Dijon mustard (optional for extra flavor)
- Salt and freshly ground black pepper, to taste
How it works: The lemon juice helps break down the fibers in the beef, while the olive oil helps to keep it moist. The combination of fresh herbs adds a fragrant, earthy flavor, and the mustard adds an extra layer of depth. This marinade works especially well for grilled or pan-seared beef dishes.
4. Balsamic Vinegar and Honey Marinade
Balsamic vinegar is known for its rich, tangy sweetness, and when paired with honey, it creates a perfectly balanced marinade for beef. The balsamic vinegar helps tenderize the meat while adding a complex flavor, while the honey brings a natural sweetness that contrasts beautifully with the savory beef.
Ingredients:
- 1/4 cup balsamic vinegar
- 2 tbsp honey or maple syrup
- 2 tbsp olive oil
- 2 cloves garlic, minced
- 1 tsp fresh rosemary or thyme, chopped
- Salt and pepper, to taste
How it works: The balsamic vinegar and honey create a delicious sweet and tangy marinade, which caramelizes as the beef cooks, giving it a rich, glossy finish. The olive oil ensures the meat remains tender and juicy, while the garlic and herbs provide a savory, aromatic flavor.
5. Spicy Chili and Lime Marinade
For a bit of heat and zest, a chili and lime marinade brings a spicy, citrusy kick to thin-sliced beef. The combination of chili, lime, and a touch of honey or brown sugar balances out the heat and gives the beef a vibrant, bold flavor. This marinade works wonders in fajitas, tacos, or any dish where you want a kick of spice.
Ingredients:
- 2 tbsp fresh lime juice
- 1 tbsp chili powder (or more for extra heat)
- 1 tsp ground cumin
- 1 tbsp honey or brown sugar
- 1 tbsp olive oil
- 1/4 tsp cayenne pepper (optional for added spice)
- Salt and pepper, to taste
How it works: The lime juice and chili powder create a zesty, spicy profile, while the honey or sugar adds a bit of sweetness to balance the heat. The oil helps coat the beef, ensuring that the marinade penetrates well and keeps the meat tender during cooking.
6. Red Wine and Rosemary Marinade
Red wine brings a deep, rich flavor to beef, making it a perfect marinade base for dishes like steak sandwiches or stir-fries. The acidity in the wine tenderizes the beef, while the rosemary adds an aromatic, earthy flavor. This marinade is particularly great for cuts like ribeye or sirloin, where the richness of the beef pairs wonderfully with the wine’s tannins.
Ingredients:
- 1/4 cup red wine (Cabernet Sauvignon or Merlot)
- 2 tbsp olive oil
- 1 tbsp red wine vinegar (optional for extra acidity)
- 1 tsp fresh rosemary, chopped
- 2 cloves garlic, minced
- Salt and freshly ground black pepper, to taste
How it works: The acidity of the red wine helps tenderize the beef, while the olive oil keeps the meat moist. The rosemary adds a savory, aromatic touch that enhances the depth of flavor in the beef.
Pro Tip: Always allow the beef to marinate for at least 30 minutes, but for maximum flavor, marinate it for 2–4 hours, or even overnight in the fridge. Be sure not to over-marinade, especially with acidic marinades like lemon or vinegar, as they can start to break down the meat too much.
These classic marinades not only help tenderize and flavor the beef but also create the perfect base for a variety of dishes, from stir-fries to grilled tacos. The right marinade can take your thin-sliced beef from good to great, infusing every slice with incredible flavor that will have everyone coming back for more.
Seasoning Tips for Maximum Flavor
Seasoning is an essential step in preparing thin-sliced beef to ensure each bite is packed with flavor. Whether you’re grilling, stir-frying, or pan-searing, the right balance of herbs, spices, and seasonings will elevate the taste of the beef. Unlike thicker cuts, where marinating might be the primary method for flavor infusion, thin-sliced beef cooks quickly and requires effective seasoning to maximize flavor without overwhelming the delicate texture of the meat.
Here are some expert tips for seasoning thin-sliced beef to perfection:
1. Use a Salt Base to Enhance Natural Flavors
Salt is the most essential seasoning for beef because it helps bring out the natural flavors of the meat. Salt acts as a flavor enhancer, drawing out the juices and helping them absorb the seasoning you add. However, timing is crucial. Applying salt too early can draw moisture out of the beef, making it dry. For thin-sliced beef, season with salt right before cooking to keep the meat tender and juicy.
Pro Tip: Consider using kosher salt or sea salt over table salt. These salts have larger crystals, which are ideal for evenly coating thin slices of beef and give you better control over the seasoning.
2. Pepper – The Perfect Pairing with Salt
Freshly ground black pepper is a must-have seasoning for any beef dish. It adds warmth and depth without overshadowing the natural flavors of the beef. Pepper pairs perfectly with salt and provides a savory punch to your beef, making it a versatile seasoning for any recipe, from stir-fries to sandwiches.
Pro Tip: Use freshly ground black pepper instead of pre-ground for better flavor. If you enjoy more heat, add a pinch of cayenne pepper or crushed red pepper flakes to bring a spicy kick.
3. Spice Blends for Unique Flavor Profiles
While salt and pepper are crucial, you can take the flavor to the next level by using spice blends. Pre-made spice mixes or custom blends can add complexity and depth to your beef. Some classic blends include:
- Garlic Powder and Onion Powder: These provide a savory, umami flavor that complements thin-sliced beef beautifully.
- Cajun Seasoning: Perfect for a bold, spicy kick, cajun seasoning brings a balance of heat, paprika, garlic, and herbs.
- Italian Herbs: A mix of dried oregano, basil, thyme, and rosemary can give a Mediterranean twist to your beef, perfect for stir-fries or sandwiches.
- Chili Powder and Cumin: These spices add warmth, smokiness, and depth, ideal for dishes like fajitas or tacos.
Pro Tip: When using spice blends, ensure they are evenly mixed and applied to the beef. You can even make your own seasoning mix by combining individual spices like paprika, garlic powder, onion powder, and herbs.
4. Fresh Herbs for Bright, Fragrant Flavor
Fresh herbs are a fantastic way to add vibrant, aromatic flavors to your thin-sliced beef. Herbs like thyme, rosemary, parsley, cilantro, and basil work well with beef, infusing the meat with fresh, fragrant notes. When using fresh herbs, it’s best to either chop them finely or use them as a garnish after cooking for a burst of flavor. Fresh herbs add an elegant touch to both simple and more complex beef dishes.
Pro Tip: For more intense flavor, try bruising or lightly crushing the herbs before adding them to your beef. This releases the oils and enhances their aromatic qualities.
5. Add Citrus Zest for Brightness
Citrus zest, such as lime, lemon, or orange zest, is a wonderful addition to thin-sliced beef, especially if you’re looking for a fresh, zesty flavor profile. The zest adds a burst of citrusy brightness without the acidity of juice, which could affect the texture of the beef. This seasoning technique works especially well in stir-fries, tacos, or grilled beef dishes where a touch of freshness can bring the flavors to life.
Pro Tip: Add zest at the very end of cooking or as a garnish to preserve its aromatic qualities. A little goes a long way, so use sparingly.
6. Marinate with Purpose, But Don’t Overdo It
While seasoning is key, a light marinade can enhance the flavor profile of thin-sliced beef. However, marinating thin slices for too long can result in mushy texture. A quick 15-30 minute marination is often sufficient to infuse the meat with flavor without compromising the tenderness. When marinating, focus on using a combination of oil, acidic ingredients (like vinegar or lemon juice), and seasonings for balanced flavor penetration.
Pro Tip: If you’re short on time, a quick dry rub of spices like garlic powder, paprika, cumin, and chili powder can also work wonders for imparting deep flavors on thin-sliced beef.
7. Don’t Forget the Finishing Touches
Once your thin-sliced beef is cooked, don’t forget to finish it with a little extra seasoning. A sprinkle of salt or pepper just before serving can elevate the flavor and make it more dynamic. For an added burst of flavor, try adding a dash of balsamic vinegar, a squeeze of fresh lime, or a drizzle of your favorite hot sauce to complement the beef.
Pro Tip: For an extra layer of flavor, consider garnishing the beef with toppings like freshly chopped herbs, crumbled cheese (like feta or Parmesan), or a squeeze of citrus.
8. Consider the Cooking Method
Different cooking methods require slightly different approaches to seasoning. For example:
- Grilling: For grilled thin-sliced beef, seasoning the beef before cooking helps develop a flavorful crust. Brush the slices with oil to prevent sticking and to help the seasoning adhere.
- Stir-Frying: When stir-frying thin-sliced beef, season with a mix of soy sauce, garlic, and a touch of sesame oil. The high heat of stir-frying seals in the flavor and allows the seasonings to coat each slice evenly.
- Pan-Searing: For pan-seared beef, you can season both before and after cooking. A quick sear in a hot pan caramelizes the surface, allowing the seasonings to intensify.
Pro Tip: Adjust the seasoning depending on the cooking method. For grilling, a dry rub works best, while for stir-frying, you may want to use liquid seasonings like soy sauce or teriyaki sauce.
Pro Tip: For best results, season your thin-sliced beef just before cooking to prevent drawing out moisture and losing tenderness. You can always adjust the seasoning as you go, tasting along the way.
With the right combination of seasonings, you can elevate your thin-sliced beef to a whole new level, enhancing both its flavor and texture. Experiment with different herbs, spices, and seasonings to find the perfect blend for your dishes. Whether you’re preparing stir-fried beef, beef fajitas, or a simple grilled sandwich, these seasoning tips will help you achieve maximum flavor every time.
How Long to Marinate
Marinating thin-sliced beef can significantly enhance its flavor and tenderness, but timing is crucial to avoid over-marinating, which can result in an unpleasant texture. The goal is to strike the perfect balance, allowing the flavors to penetrate the beef without breaking down its delicate fibers. Below are key considerations and guidelines on how long to marinate thin-sliced beef for optimal results:
1. The Basics of Marinating Time
Thin-sliced beef is different from thicker cuts of meat, as it cooks quickly. This means it also absorbs marinade more quickly. For most thin-sliced beef dishes, marinating for 15 to 30 minutes is usually sufficient to achieve a flavorful result. The marinade should lightly penetrate the meat to enhance its taste without overwhelming the texture. Over-marinating thin slices can cause the meat to become mushy or overly soft, as the acids in the marinade begin to break down the proteins too much.
Pro Tip: Always marinate in the refrigerator to prevent any bacterial growth. Avoid marinating at room temperature.
2. Marinating with Acidic Ingredients
Many marinades include acidic ingredients like vinegar, lemon juice, or wine, which help tenderize the meat by breaking down the connective tissues. However, for thin-sliced beef, these acids can quickly overpower the meat’s delicate texture if left too long. A short marinating time of 15 to 20 minutes is enough to add flavor without making the beef too tender. For a more intense flavor, you can marinate for up to 30 minutes. After that, the beef may start to lose its firm texture.
Pro Tip: If you prefer to marinate for longer, consider using a marinade with a lower acidity or incorporate oil to buffer the acidic effect.
3. Flavor-Infusing Marinades (Non-Acidic)
Non-acidic marinades, such as those based on oils, soy sauce, or herbs, are gentler on thin-sliced beef and can be left to marinate for slightly longer periods without compromising texture. Marinades like these typically contain salt, which helps draw out moisture and infuse the beef with flavors. For these types of marinades, 30 minutes to 1 hour is an optimal range for marinating thin-sliced beef.
Pro Tip: If you’re working with a dry rub or spice mix, applying it directly to the beef and letting it sit for 15 to 30 minutes can be enough to enhance the beef’s natural flavor.
4. Marinating Thin-Sliced Beef for Stir-Fry or Quick-Cooking Dishes
For dishes like stir-fries or fajitas, thin-sliced beef cooks in a hot pan for just a few minutes. Therefore, you don’t need to marinate the beef for long. 15 to 20 minutes is typically enough to allow the flavors to soak in without compromising the beef’s tenderness.
- Quick Tips for Stir-Frying: When marinating for stir-fries, opt for a marinade with soy sauce, garlic, and sesame oil. These ingredients can add depth and flavor in a short marination time.
Pro Tip: If you’re stir-frying or searing, avoid marinating the beef too long, as the texture can change during cooking, especially if you’re using acidic ingredients.
5. Marinating Thin-Sliced Beef for Grilling or Skewers
For grilling or skewered dishes, where the beef is exposed to direct heat, marinating time should still be kept relatively short. Thin-sliced beef will cook quickly, so marinating for 15 to 30 minutes is often enough. This ensures the beef remains juicy and tender, with the marinade creating a flavorful crust on the exterior when grilled.
Pro Tip: For grilling, consider a marinade that has oil and herbs for added moisture and flavor while cooking.
6. The Importance of Reaching Room Temperature Before Cooking
Even though you don’t need to marinate for hours, it’s essential to allow the marinated beef to sit at room temperature for 10 to 15 minutes before cooking. This helps ensure the beef cooks evenly and avoids a cold, tough center.
Pro Tip: Take the beef out of the refrigerator before cooking to allow it to warm up slightly. This helps in even cooking and prevents the meat from seizing up due to temperature shock.
7. Avoiding Over-Marinating
While it’s tempting to leave thin-sliced beef in a marinade for longer to intensify the flavor, marinating for too long can cause the meat to break down, especially if the marinade is acidic. Over-marinated beef can end up being mushy and unappealing. Therefore, marinating for more than 1 hour (unless specified in a specific recipe) is generally not recommended for thin-sliced beef.
Pro Tip: For marinating for longer periods, consider freezing the beef with the marinade to preserve its texture and flavor.
8. How to Tell When Marination Is Done
The best indicator that the marination process is complete is to taste the beef. After marinating for the appropriate time, you should notice a balance of flavor that permeates the meat without it becoming overly soft. You should also see that the beef has absorbed the color and aroma of the marinade. If the beef looks too wet or mushy, it’s an indicator that it may have marinated for too long.
Pro Tip: To ensure your marinade doesn’t overpower the beef, test it out with a small piece before marinating the entire batch.
By following these marinating guidelines, you can ensure that your thin-sliced beef is perfectly seasoned and tender without losing its texture. Remember that shorter marination times are often better when working with thin cuts, but the exact time will depend on the type of marinade and the cooking method you’re using. Experimenting with marination time based on the cut and recipe will help you achieve the most flavorful and juicy results.
Cooking Methods for Perfect Thin-Sliced Beef
Stir-Frying on a Skillet
Stir-frying is one of the quickest and most flavorful methods to cook thin-sliced beef. Using a skillet for stir-frying allows for high heat and fast cooking, ensuring that the beef remains tender and juicy while developing a rich, caramelized crust. To achieve the best results, there are a few key techniques and tips to consider when stir-frying thin-sliced beef in a skillet.
1. Choosing the Right Skillet
The choice of skillet is crucial for a successful stir-fry. Ideally, you’ll want to use a heavy-bottomed skillet or cast-iron pan that can retain heat and distribute it evenly. A well-heated skillet allows the beef to sear quickly without releasing too much moisture, helping to lock in flavor and tenderness.
- Pro Tip: A wok is another excellent option for stir-frying, but if you don’t have one, a large, heavy skillet or frying pan will work just as well.
2. Preparing the Beef
For stir-frying, thin-sliced beef is typically cut into strips or bite-sized pieces, making it perfect for quick cooking. However, it’s important to pat the beef dry before adding it to the skillet. Excess moisture will cause the beef to steam rather than sear, resulting in a less desirable texture and flavor.
- Pro Tip: If you marinated the beef, make sure to drain off any excess marinade before cooking to avoid overcrowding the pan with liquid.
3. Heating the Skillet
Before adding the beef to the skillet, make sure the pan is hot. You want the skillet to be at medium-high to high heat, which will allow the beef to sear rather than stew. Heating the skillet beforehand helps achieve the characteristic crispness and caramelized edges associated with stir-fry dishes.
- Pro Tip: Test the skillet’s temperature by sprinkling a few drops of water into it. If the water sizzles and evaporates almost immediately, the skillet is ready.
4. Cooking the Beef
Once the skillet is hot, add a small amount of oil with a high smoke point, such as vegetable oil, peanut oil, or canola oil. Swirl the oil around the pan to coat it evenly, and then immediately add the thin-sliced beef in a single layer. Avoid overcrowding the pan—cook in batches if necessary, as overcrowding can lower the temperature of the skillet and cause the beef to steam instead of sear.
- Pro Tip: To achieve the best results, let the beef sear undisturbed for 1–2 minutes before stirring. This allows the beef to develop a golden-brown crust.
5. Stir-Frying Technique
Once the beef starts to sear, stir-fry quickly using a spatula or tongs. Stir-fry for 2 to 4 minutes, depending on the thickness of the beef slices and the level of doneness you desire. The key is to keep the beef moving in the skillet, ensuring it cooks evenly and quickly while retaining moisture.
- Pro Tip: Keep the beef in constant motion in the pan to prevent overcooking or burning. Stir-frying is all about speed and high heat.
6. Flavoring the Beef
As the beef cooks, you can add flavor-enhancing ingredients such as soy sauce, garlic, ginger, chili paste, or hoisin sauce. Be sure to add these ingredients toward the end of the cooking process to prevent them from burning, as most of these sauces are prone to caramelizing or burning at high temperatures.
- Pro Tip: For additional flavor, you can also add vegetables (such as bell peppers, onions, or snap peas) to the skillet during the last minute of cooking. Stir-frying vegetables and beef together gives you a perfectly balanced dish.
7. Cooking to the Right Doneness
Thin-sliced beef cooks quickly, so it’s important to avoid overcooking it. The beef should be tender and slightly caramelized on the outside, but still juicy on the inside. When stir-frying, always keep an eye on the beef to ensure it doesn’t dry out. Once the beef is browned on all sides and cooked through, remove it from the skillet immediately to prevent further cooking.
- Pro Tip: To check for doneness, slice a piece of beef in the center. It should be slightly pink inside but not raw, as overcooked beef will become tough and dry.
8. Resting After Stir-Frying
Once the beef is cooked, remove it from the skillet and let it rest for a couple of minutes before serving. This resting period allows the juices to redistribute within the meat, making it more tender and flavorful.
- Pro Tip: If you’re stir-frying vegetables along with the beef, you can toss them in the skillet once the beef is removed to finish cooking and absorb any remaining sauce in the pan.
9. Serving Suggestions
After stir-frying, the thin-sliced beef is ready to be served over steamed rice, noodles, or in a stir-fry bowl. Garnish with fresh herbs like cilantro, green onions, or a sprinkle of sesame seeds for added texture and flavor. You can also drizzle extra sauce over the top for a more intense taste.
- Pro Tip: Serve your stir-fry with a side of crispy spring rolls, egg rolls, or dumplings for a complete meal.
By mastering the stir-frying technique in a skillet, you can achieve perfectly cooked thin-sliced beef every time. The key is using high heat, keeping the beef moving, and avoiding overcooking. With these tips, you’ll be able to create delicious, savory stir-fry dishes that are packed with flavor and tender beef.
Grilling Thin Beef Slices
Grilling thin beef slices can deliver an incredible depth of flavor, with the smoky aroma and char marks that only an open flame can provide. However, grilling thin slices of beef requires special care and technique to ensure that the meat remains juicy, tender, and perfectly cooked without overcooking or drying out. Below are key tips and techniques for grilling thin beef slices to perfection.
1. Preheat the Grill
Before you begin grilling, preheat your grill to a medium-high heat. Whether you’re using a charcoal grill or a gas grill, it’s essential to ensure the grill grates are hot before adding the beef. A preheated grill allows the beef to sear quickly, locking in the juices and creating those beautiful grill marks.
- Pro Tip: Test the grill temperature by holding your hand above the grill grates. If you can only hold it there for 2-3 seconds, the grill is at medium-high heat.
2. Prepare the Beef for Grilling
Thin-sliced beef needs to be prepared properly before grilling to ensure that it cooks evenly and stays tender. First, make sure the beef is patted dry with paper towels. This removes excess moisture, allowing the beef to sear rather than steam on the grill.
- Marinate or Season: While you can certainly grill thin beef slices without a marinade, marinating or seasoning the meat beforehand will enhance the flavor. Marinades with oil, acid (like vinegar or lemon juice), and spices can add richness and tenderize the beef. For simple grilling, season the slices with salt, pepper, garlic powder, and a dash of olive oil. If you’re working with more delicate cuts, a soy sauce-based marinade or herb rub works wonders.
- Pro Tip: Consider cutting the beef against the grain into thin strips to make it easier to eat after grilling.
3. Use Skewers for Even Grilling
For thin slices of beef, skewering the meat can make grilling easier and more efficient. If the beef is sliced into strips, thread them onto skewers to ensure they grill evenly. Skewers also prevent the slices from falling through the grill grates.
- Pro Tip: Use metal skewers if possible, as they conduct heat better than wooden ones and prevent the skewers from burning.
4. Place Beef on the Grill
Once the grill is properly heated and the beef is prepped, place the thin beef slices on the grill. Arrange them in a single layer, ensuring that there is enough space between each slice for the hot air to circulate. Overcrowding can lead to uneven cooking and steaming rather than searing.
- Pro Tip: If grilling longer slices, position them across the grill grates to get those iconic cross-hatch grill marks.
5. Grill Thin Beef Slices Quickly
Thin beef slices cook very quickly on the grill, typically in about 1 to 2 minutes per side depending on the thickness of the slices and the heat of the grill. Since the beef is thin, it only requires a short amount of time to reach the desired doneness.
- Pro Tip: Avoid pressing down on the beef with tongs or a spatula. This will squeeze out juices, causing the beef to dry out. Instead, let the beef naturally sear on the grill.
6. Monitor for Doneness
Because thin slices cook rapidly, it’s essential to monitor the beef closely. For rare to medium-rare beef, grill it for just 1 minute per side. For medium, aim for around 2 minutes per side. Any longer, and you risk overcooking and making the beef tough and chewy.
- Pro Tip: If you have a meat thermometer, use it to check for doneness. Thin beef slices don’t need long to reach the correct internal temperature. For medium-rare, it should be around 130°F (54°C), and for medium, around 140°F (60°C).
7. Add Flavor with Smoke
For added depth of flavor, you can use wood chips or a smoker box on your gas grill to infuse the beef with a smoky aroma. This works especially well for cuts like flank steak or skirt steak, which have a natural grain that benefits from the smoky flavor.
- Pro Tip: For a more intense smoky flavor, add soaked hickory, mesquite, or applewood chips to your grill or smoker box.
8. Rest the Beef After Grilling
Once the thin beef slices are done grilling, allow them to rest for 2-3 minutes before serving. Resting helps the juices redistribute throughout the meat, ensuring that the slices stay juicy and tender.
- Pro Tip: Cover the beef loosely with aluminum foil to keep it warm while resting.
9. Slice Against the Grain
After the beef has rested, it’s time to serve. To ensure the beef is as tender as possible, slice it against the grain. This breaks up the muscle fibers, making the beef easier to chew and enhancing its overall tenderness.
- Pro Tip: If you’re grilling longer cuts like skirt or flank steak, cut them into smaller portions after grilling and then slice them thinly across the grain.
10. Serve and Enjoy
Thin-sliced beef grilled to perfection is incredibly versatile. Serve it as a main dish with sides such as grilled vegetables, potatoes, or rice, or incorporate it into tacos, sandwiches, or wraps. The smoky, savory flavors make it an excellent addition to almost any meal.
- Pro Tip: Garnish with fresh herbs like cilantro, parsley, or green onions to add a burst of freshness.
Grilling thin-sliced beef can be a quick and delicious way to enjoy tender, smoky meat with a perfectly charred exterior. By following these grilling tips—such as preheating the grill, monitoring the beef closely, and ensuring you slice against the grain—you’ll be able to create flavorful and juicy grilled beef slices every time.
Searing vs. Simmering
When preparing thin-sliced beef, it’s important to understand the difference between searing and simmering, as both techniques create vastly different textures, flavors, and overall results. While both methods have their place in cooking, knowing when to use one over the other can elevate your dish and bring out the best in your thin-sliced beef.
1. What is Searing?
Searing involves cooking the beef quickly at high heat to create a brown, caramelized crust on the outside. The goal is to develop intense flavors by browning the meat’s surface without cooking the interior for too long. Searing is often used for cuts of meat that benefit from a crisp, flavorful outer layer while maintaining tenderness on the inside, such as thin-sliced beef.
- How to Sear Thin Beef Slices: To sear thin beef slices, ensure that your skillet, grill, or pan is preheated to a high temperature. Add a small amount of oil with a high smoke point (like vegetable, canola, or grapeseed oil) to the pan and allow it to heat up. Place the beef slices in a single layer and cook for 1–2 minutes on each side, until you see a golden-brown, crispy crust. Thin slices cook quickly, so it’s crucial to avoid overcooking them to keep them tender.
- Pro Tip: Don’t overcrowd the pan—this will cause the beef to steam rather than sear. Cook the beef in batches if necessary to ensure even searing.
- Benefits of Searing:
- Flavorful crust: Searing caramelizes the sugars in the beef, creating a rich, savory flavor that is often enhanced by a slight char.
- Texture contrast: The contrast between the crispy outer layer and tender, juicy interior is highly desirable in many dishes, such as stir-fries or grilled steaks.
- When to Use Searing: Searing is best for when you want to lock in the natural juices of the beef while developing a delicious exterior. It’s ideal for thin beef slices used in stir-fries, sandwiches, or dishes where a crisp texture is desired.
2. What is Simmering?
Simmering, on the other hand, involves cooking beef at a low to medium heat for an extended period, typically in liquid such as broth, wine, or sauce. Unlike searing, the purpose of simmering is to cook the beef gently and evenly throughout, which is perfect for tougher cuts or dishes where a rich, flavorful sauce is important.
- How to Simmer Thin Beef Slices: While thin-sliced beef doesn’t typically require long cooking times like tougher cuts (e.g., chuck roast), simmering can be used to tenderize the meat in a flavorful liquid. To simmer thin beef, place the beef slices in a pot or pan with enough liquid to cover them halfway. Heat the liquid to a gentle simmer (just below boiling) and cook the beef for 20–30 minutes, stirring occasionally. This process allows the beef to absorb the flavors of the broth or sauce while tenderizing.
- Pro Tip: Do not bring the liquid to a rapid boil—doing so can toughen the beef. Keep the temperature low and maintain a gentle simmer for the best results.
- Benefits of Simmering:
- Tenderizes the beef: Slow cooking in liquid breaks down tough fibers and collagen, making the beef tender and easy to shred or slice.
- Enhances flavors: Simmering allows the beef to absorb the flavors of the liquid and spices, creating a deep, rich taste that permeates the meat.
- When to Use Simmering: Simmering is ideal when you want to cook thin-sliced beef in a sauce or soup, or when you’re making dishes like beef stew, beef stroganoff, or beef in red wine sauce. It’s also a great technique for dishes that require the beef to be tenderized and infused with the flavors of the cooking liquid.
3. Key Differences Between Searing and Simmering
The fundamental differences between searing and simmering come down to temperature, time, and texture:
| Feature | Searing | Simmering |
|---|---|---|
| Cooking Method | High heat, quick cooking | Low heat, slow cooking |
| Time | 1–2 minutes per side | 20–30 minutes (depending on the cut) |
| Result | Brown, crispy exterior with a tender interior | Tender, juicy beef absorbed with flavor |
| Best For | Stir-fries, grilled dishes, steaks | Stews, soups, braises |
| Texture | Crispy exterior, juicy interior | Tender, sometimes shredded |
| Flavors | Enhanced by caramelization and char | Infused with the cooking liquid |
4. Combining Searing and Simmering
In many recipes, searing and simmering can be combined for a more complex flavor profile. For example, braising is a technique that starts with searing the beef at high heat to develop a flavorful crust, followed by simmering the beef in liquid to tenderize it and infuse it with sauce or broth. This method allows you to get the best of both worlds—crispy, browned meat on the outside and a tender, flavorful interior.
- Example Recipe: In a dish like beef stew, you might start by searing the thin beef slices to create a rich, brown crust, then add vegetables, broth, and seasonings and simmer everything together until the beef becomes tender and infused with the flavors of the sauce.
- Pro Tip: When combining searing and simmering, always make sure to scrape up the browned bits from the pan after searing. These caramelized bits, known as fond, are packed with flavor and will add depth to the simmering liquid.
Both searing and simmering have distinct roles in cooking thin-sliced beef, and knowing when to use each technique can help you achieve the perfect texture and flavor for your dish. Searing is ideal for developing a rich, flavorful crust on the beef, while simmering works best for tenderizing and infusing the beef with rich, savory flavors. By understanding these methods, you can make the most out of your thin beef slices and create dishes that are both flavorful and tender.
Recipe Ideas for Thin-Sliced Beef
Beef Stir-Fry with Vegetables
Beef stir-fry with vegetables is a quick, versatile, and flavorful dish that showcases the best of thin-sliced beef. It’s a go-to option for busy weeknights, dinner parties, or meal prepping, as it requires minimal cooking time and offers endless variations. The combination of tender beef slices and crisp vegetables creates a balance of textures, while the stir-frying process locks in the natural flavors of the beef while absorbing the savory sauces and seasonings used.
1. Why Beef Stir-Fry Works with Thin Slices
Thin-sliced beef is the perfect choice for stir-fry because it cooks rapidly, allowing you to achieve that tender, juicy texture without overcooking the meat. The quick cooking time preserves the beef’s tenderness while giving it a nice sear on the outside. Additionally, when sliced thinly, the beef can easily absorb the flavors of the stir-fry sauce, resulting in a well-seasoned and succulent dish.
- Cutting the Beef Thin: Choose cuts like flank steak, sirloin, or skirt steak—all of which are great for stir-frying due to their natural tenderness and ability to absorb flavors. When slicing, make sure to cut against the grain to ensure the beef is as tender as possible.
- Cooking Tip: For the best results, marinate the beef for at least 20 minutes before cooking. This enhances its flavor and makes it more tender when stir-fried.
2. Choosing Vegetables for Stir-Fry
A successful beef stir-fry is built upon a foundation of fresh, crisp vegetables that contrast nicely with the beef. The key is to select vegetables that can hold up to the high heat of stir-frying without becoming mushy. Here are some of the best vegetable options:
- Bell Peppers: Their mild sweetness and vibrant color add both flavor and visual appeal.
- Onions: Offer a savory, slightly sweet flavor when cooked, enhancing the depth of the stir-fry.
- Broccoli: A hearty vegetable that holds up well during stir-frying, providing a nice crunch.
- Snow Peas: Their tender texture and slight sweetness complement the savory beef.
- Carrots: Slice them thinly to ensure they cook evenly and add a slight sweetness.
- Mushrooms: Their earthy flavor pairs wonderfully with beef and absorbs stir-fry sauces well.
Feel free to get creative and add other vegetables, such as baby corn, water chestnuts, or zucchini. A well-balanced stir-fry will have a variety of vegetables in different colors, which enhances both the flavor and the aesthetic of the dish.
3. Stir-Fry Sauce: The Key to Flavor
A flavor-packed stir-fry sauce ties everything together, coating the beef and vegetables in a savory glaze. The base of most stir-fry sauces includes soy sauce, ginger, garlic, and sesame oil. Here’s a simple stir-fry sauce you can customize based on your tastes:
- Soy Sauce: Adds a salty, umami-rich base that complements the beef and vegetables.
- Garlic: Offers a fragrant depth of flavor that brings a savory aroma to the dish.
- Ginger: Provides a hint of spice and warmth that works well with the beef and veggies.
- Sesame Oil: Adds a nutty richness to the stir-fry, enhancing the overall flavor profile.
- Rice Vinegar or Lime Juice: A touch of acidity brightens the dish and balances the richness of the sauce.
You can also experiment with other ingredients like hoisin sauce, chili paste, or fish sauce to create a more complex and dynamic sauce.
- Tip for a Thickened Sauce: For a thicker sauce, mix a tablespoon of cornstarch with a little water to create a slurry. Add it to the stir-fry near the end of cooking to give the sauce a silky texture that clings to the beef and vegetables.
4. Cooking Technique for Stir-Fry
Stir-frying is all about high heat and fast cooking. Here’s how to achieve the perfect stir-fry:
- Preheat the Pan or Wok: Use a wok or large skillet that can hold all your ingredients comfortably. Make sure the pan is extremely hot before adding oil. This helps in creating a good sear on the beef and prevents the vegetables from releasing too much moisture.
- Oil Selection: Use an oil with a high smoke point, such as vegetable oil, canola oil, or peanut oil. This will allow you to cook at high temperatures without burning the oil or creating an off flavor.
- Cook in Batches: If you’re making a large stir-fry, it’s best to cook the beef and vegetables in batches to avoid overcrowding the pan. When the pan is overcrowded, the ingredients steam instead of stir-frying, and you won’t get that crispy texture.
- Stir Frequently: Stirring constantly allows the ingredients to cook evenly and ensures that the beef doesn’t stick to the pan. It also ensures that all the vegetables are evenly coated with the sauce.
5. How to Serve Beef Stir-Fry with Vegetables
Beef stir-fry can be enjoyed in many different ways, depending on your preferences and dietary needs. Here are some common options:
- Serve Over Rice: A classic pairing, stir-fry over steamed white rice, brown rice, or jasmine rice provides a hearty base for the savory beef and vegetables.
- Serve with Noodles: For a noodle stir-fry, use rice noodles, udon noodles, or egg noodles for a satisfying, filling dish.
- Low-Carb Option: Serve the stir-fry over cauliflower rice or zoodles (zucchini noodles) for a lower-carb alternative.
- Garnish: Top your stir-fry with toasted sesame seeds, chopped green onions, or a drizzle of sriracha for an extra kick.
6. Customizing Beef Stir-Fry
Beef stir-fry is incredibly customizable. Depending on your preferences, you can adjust the spice level, use different vegetables, or incorporate different proteins, such as chicken, shrimp, or tofu. You can also tweak the sauce to fit your flavor profile, whether you prefer something sweet, savory, or spicy.
- Add Heat: For a spicy kick, add sriracha or chili flakes to the sauce or stir-fry.
- Sweeten It Up: If you enjoy a sweeter stir-fry, incorporate a tablespoon of honey or brown sugar into the sauce.
- Veggie Variations: If you have leftover vegetables, this is the perfect dish to incorporate them, from leafy greens like spinach to other root vegetables like sweet potatoes or beets.
Beef stir-fry with vegetables is a fantastic way to enjoy thin-sliced beef in a healthy, quick, and delicious meal. With the right cuts of beef, fresh vegetables, and a flavorful stir-fry sauce, this dish can easily become a staple in your cooking repertoire. Whether you serve it over rice, noodles, or low-carb alternatives, beef stir-fry is versatile enough to suit any occasion or dietary preference. Experiment with different flavor combinations and make this meal your own—every bite is guaranteed to be a satisfying experience!
Teriyaki Beef Strips
Teriyaki beef strips are a delicious, sweet, and savory dish that showcases the bold flavors of Japanese-inspired teriyaki sauce while keeping the beef tender and juicy. This recipe involves marinating thinly sliced beef in a flavorful sauce, then cooking it until golden and caramelized. It’s an ideal option for a quick dinner, a protein-packed appetizer, or even a meal prep favorite. The combination of rich soy sauce, sweet mirin, and a touch of ginger and garlic creates a perfectly balanced sauce that pairs beautifully with tender strips of beef.
1. Why Teriyaki Beef Strips Are Perfect with Thinly Sliced Beef
Thinly sliced beef is ideal for teriyaki beef strips because it absorbs the marinade quickly, ensuring that the beef is infused with all the savory flavors. Thin slices of beef also cook quickly, ensuring that you get a tender, juicy bite without overcooking the meat. The key to achieving the perfect texture is ensuring the beef is sliced against the grain, which helps to keep it tender and easy to chew.
- Cuts of Beef: For teriyaki beef strips, flank steak, sirloin, or ribeye work exceptionally well. These cuts are flavorful and tender, perfect for stir-frying or grilling with the sweet and salty teriyaki sauce.
- Slicing Thin: The thin slices ensure that each piece gets evenly coated with the marinade and sears properly, making every bite flavorful. You can also freeze the beef for about 30 minutes before slicing to make the process easier.
2. Essential Ingredients for Teriyaki Sauce
The heart of the dish is the teriyaki sauce, which should be sweet, salty, and umami-packed. You can either make your own from scratch or use a store-bought version. Here are the key ingredients for a homemade teriyaki sauce:
- Soy Sauce: Provides the saltiness and depth of flavor that forms the base of the sauce.
- Mirin: A sweet rice wine that adds a subtle sweetness and balance to the sauce. If you can’t find mirin, you can substitute it with a mix of white wine and a bit of sugar.
- Sugar (or Honey): Adds sweetness to balance out the saltiness of the soy sauce and enhances the glossy finish when cooking the beef.
- Ginger and Garlic: Fresh grated ginger and minced garlic infuse the sauce with a fragrant, zesty flavor that pairs well with the beef.
- Sesame Oil: A small amount of sesame oil adds a nutty flavor to the sauce and complements the savory beef.
- Cornstarch: For thickening the sauce and giving it a glossy, sticky consistency, cornstarch can be added to the sauce mixture before cooking.
3. How to Marinate the Beef
Marinating the beef in teriyaki sauce is essential for achieving the rich flavors. The marinade allows the beef to soak in the sweetness and savory flavors, creating a harmonious balance when cooked. Here’s how to marinate your beef for the best results:
- Marinating Time: Marinate the beef strips for at least 30 minutes—though 1 to 2 hours is ideal for deeper flavor penetration. For a quicker marinate, you can even marinate it for just 15-20 minutes if pressed for time.
- Marinating in the Fridge: Always marinate the beef in the refrigerator to prevent any bacterial growth. Use a resealable bag or a shallow dish for marinating, ensuring the beef is evenly coated with the sauce.
- Do Not Overmarinate: While marinating is important, do not marinate the beef for too long, as the acidity and salt in the soy sauce can begin to break down the proteins in the meat, making it too soft and mushy.
4. Cooking Techniques for Teriyaki Beef Strips
The key to great teriyaki beef strips is the cooking method, which should enhance the beef’s flavor while retaining its tenderness. There are several methods you can use to cook the beef:
- Stovetop Skillet: A skillet is a quick and easy option. Heat a bit of oil (such as vegetable or canola oil) in a large pan over medium-high heat. Once the pan is hot, add the marinated beef strips and cook them for about 2-3 minutes per side, or until the beef is browned and slightly caramelized. Make sure to stir frequently to ensure even cooking and avoid burning the sauce.
- Grilling: Grilling adds a beautiful char and smoky flavor to the teriyaki beef strips. Preheat the grill to medium-high and grill the beef strips for about 2-3 minutes per side, or until they are cooked through with a nice sear. Brush a bit of extra teriyaki sauce on the beef during the last minute of grilling for an extra flavor boost.
- Broiling: If you don’t have a grill, broiling the beef strips is an excellent alternative. Place the marinated beef under a preheated broiler for about 2-3 minutes per side. This method ensures a quick sear while keeping the beef juicy inside.
- Stir-Frying: For a traditional stir-fry, use a wok or large skillet over high heat. Add the beef in batches, allowing it to sear without overcrowding the pan. Once cooked, toss the beef with the extra teriyaki sauce in the pan for a few seconds to coat the beef strips before serving.
5. Serving Suggestions for Teriyaki Beef Strips
Teriyaki beef strips are incredibly versatile and can be paired with a variety of sides to complement their sweet and savory flavor. Here are some delicious ways to serve your teriyaki beef strips:
- Over Steamed Rice: Serve the beef strips over a bed of steamed white rice, brown rice, or even fried rice for a filling meal.
- With Noodles: Pair the beef with soba noodles, udon noodles, or ramen for a complete Asian-inspired meal.
- With Vegetables: Add stir-fried or steamed vegetables like broccoli, snow peas, carrots, and mushrooms alongside the beef strips to balance the flavors.
- In Wraps: For a lighter option, wrap the beef strips in lettuce leaves or use them as a filling for Asian rice paper rolls for a delicious appetizer or snack.
- As an Appetizer: Serve the teriyaki beef strips as a finger food or appetizer with toothpicks for a party or gathering.
6. Customizing Teriyaki Beef Strips
You can adjust the teriyaki beef strips to suit your preferences. For a spicier version, add chili paste or sriracha to the sauce. If you prefer a sweeter flavor, incorporate brown sugar or pineapple juice into the marinade. You can also experiment with different cuts of beef or use chicken or pork for a variation of this dish.
For those seeking a more nutritious version, use low-sodium soy sauce or coconut aminos to reduce the salt content, while still keeping that signature teriyaki flavor.
Teriyaki beef strips offer a perfect balance of sweetness and savory depth and are a fantastic way to enjoy thinly sliced beef. Whether you’re preparing a quick weeknight meal or a dish to impress guests, this recipe is easy to make, full of flavor, and highly customizable. From the marinade to the cooking method, every step plays a key role in delivering delicious, tender beef strips coated in a rich teriyaki sauce. Experiment with different sides and cooking methods to make this dish your own and enjoy the vibrant, umami-packed flavors in every bite.
Garlic Butter Beef Skillet
The Garlic Butter Beef Skillet is an indulgent, flavor-packed dish that combines the richness of butter, the aromatic power of garlic, and the savory goodness of thinly sliced beef. This recipe is a go-to for quick dinners, as it takes minimal time to prepare yet delivers a satisfying and comforting meal that feels gourmet. The beef is seared in garlic-infused butter, allowing it to soak up the flavorful fats, resulting in each bite being tender, juicy, and coated in an irresistible garlic butter sauce.
1. Why Garlic Butter is Perfect for Thin Sliced Beef
Thinly sliced beef is an excellent candidate for garlic butter cooking because the beef absorbs the flavors quickly and cooks in a short amount of time. The combination of garlic and butter enhances the natural richness of the beef without overpowering it. Thin beef slices also cook evenly in the skillet, which allows the garlic butter to coat the beef evenly, ensuring that each piece is loaded with flavor.
- Cuts of Beef: For this recipe, choose cuts like sirloin, flank steak, or ribeye, which are tender yet affordable options that cook well in a skillet. These cuts provide enough flavor and juiciness to make the garlic butter shine without requiring long cooking times.
- Slicing Thinly: Cutting the beef into thin strips ensures that it cooks quickly and remains tender. The key is to slice against the grain for maximum tenderness and a pleasant texture. You can freeze the beef for 15-30 minutes before slicing to make it easier to get perfect thin slices.
2. Key Ingredients for Garlic Butter Beef Skillet
The foundation of this dish lies in the garlic butter sauce. To achieve that rich, garlicky goodness, the following ingredients are essential:
- Butter: Use unsalted butter as your base, since it allows you to control the amount of seasoning added later. The butter acts as the fat to carry the garlic and seasonings, creating a luscious sauce.
- Garlic: Fresh garlic cloves, minced or smashed, are key to achieving a bold garlic flavor. Be sure to sauté the garlic in butter over medium heat to release the full essence of the garlic without burning it.
- Herbs: Fresh or dried herbs such as parsley, thyme, and rosemary add a burst of freshness that elevates the garlic butter sauce. Parsley is particularly great for garnish, giving the dish a pop of color.
- Olive Oil: A small splash of olive oil can help prevent the butter from burning while adding a subtle fruity flavor to the dish.
- Beef Broth: For added richness and to help loosen the garlic butter sauce, beef broth (or chicken broth if you prefer) can be incorporated into the skillet. It also adds extra flavor to the beef.
- Salt and Pepper: These basic seasonings bring out the natural flavors in the beef and garlic. Add them to taste to ensure the right balance of seasoning.
- Lemon Juice (optional): A squeeze of fresh lemon juice right before serving can provide a burst of freshness and help balance the richness of the butter sauce.
3. How to Make Garlic Butter Beef Skillet
Making garlic butter beef skillet is quick and straightforward, but there are some key techniques to ensure that the beef stays tender and the garlic butter sauce is perfectly balanced:
- Step 1: Prepare the Beef. Begin by slicing the beef thinly against the grain. For best results, freeze the beef for about 30 minutes to firm it up, making slicing easier and more uniform.
- Step 2: Cook the Garlic. In a large skillet, heat butter and olive oil over medium heat. Add minced garlic and sauté for 1-2 minutes, until fragrant. Be careful not to let the garlic burn—if it starts to brown too quickly, lower the heat.
- Step 3: Sear the Beef. Add the thinly sliced beef to the skillet in batches to avoid overcrowding. Cook the beef for about 1-2 minutes per side, allowing it to sear and develop a golden brown color. Once cooked, remove the beef from the skillet and set it aside.
- Step 4: Create the Sauce. With the beef removed, add a splash of beef broth to the pan to deglaze, scraping up any browned bits from the bottom of the skillet. This adds additional flavor to the sauce.
- Step 5: Combine and Coat. Return the beef to the skillet, allowing it to soak up the garlic butter sauce. Stir everything together, making sure the beef is well coated with the sauce. You can add additional herbs, lemon juice, or seasoning at this point for extra depth of flavor.
- Step 6: Serve. Once the beef is coated with the garlic butter sauce and heated through, remove it from the skillet and serve immediately. Garnish with fresh parsley and a lemon wedge if desired.
4. Optional Add-ins and Variations
While the classic garlic butter beef skillet is delicious on its own, you can elevate the dish by adding a variety of ingredients to complement the beef:
- Mushrooms: Adding sautéed mushrooms to the garlic butter beef skillet brings a deep, earthy flavor that pairs wonderfully with the rich garlic butter sauce.
- Onions: Caramelized onions can add a sweet contrast to the savory garlic and beef flavors.
- Veggies: Incorporating other vegetables such as bell peppers, zucchini, or spinach adds a burst of color and nutrients, making this dish a more well-rounded meal.
- Cheese: A sprinkle of grated Parmesan or shredded mozzarella over the finished dish can add an extra layer of richness and a delightful creamy texture.
5. Serving Suggestions for Garlic Butter Beef Skillet
Garlic butter beef skillet is incredibly versatile when it comes to sides. Here are some ideas for what to serve it with:
- Mashed Potatoes: The rich, creamy texture of mashed potatoes soaks up the garlic butter sauce, creating a mouthwatering combination.
- Rice: Serve the beef over steamed white rice, brown rice, or even fried rice for a quick, satisfying meal.
- Pasta: For an Italian twist, serve the garlic butter beef on top of pasta such as linguine or fettuccine. Toss the pasta in the garlic butter sauce for extra flavor.
- Roasted Vegetables: Roasted asparagus, broccoli, or carrots are a healthy and flavorful accompaniment to this rich dish.
- Crusty Bread: Don’t forget a piece of crusty bread or garlic bread to soak up all the delicious garlic butter sauce.
6. Customizing Garlic Butter Beef Skillet
To make the dish your own, consider these customizations:
- Heat Level: Add red pepper flakes or a dash of cayenne pepper for some spice and heat.
- Creaminess: For a creamy version, stir in a bit of heavy cream or cream cheese into the sauce to create a rich, velvety finish.
- Low-Carb Option: For a low-carb version, serve the garlic butter beef with cauliflower rice or alongside a salad instead of traditional sides like potatoes or rice.
The Garlic Butter Beef Skillet is a quick, easy, and luxurious dish that combines the best of both worlds: tender thin slices of beef and a rich, flavorful garlic butter sauce. With its versatility, you can adjust the recipe to suit your tastes by adding different vegetables, herbs, or heat levels. It’s the perfect weeknight dinner, yet fancy enough to serve at a gathering or dinner party. Serve it with your favorite side dish, and you’ve got an unforgettable meal that will leave everyone asking for seconds.
Beef and Rice Bowl
A Beef and Rice Bowl is the perfect comfort food, combining the hearty richness of thin-sliced beef with the satisfying texture of fluffy rice. This dish is versatile, easy to prepare, and can be customized with various vegetables, sauces, and seasonings to suit your preferences. It’s a balanced meal that offers protein, carbs, and fiber, making it both nutritious and delicious. Whether you’re looking for a quick weeknight dinner or a meal-prep solution, a beef and rice bowl is an excellent choice.
1. Why Beef and Rice Pair So Well Together
The combination of beef and rice has long been a beloved culinary duo. Beef provides a rich, savory protein source, while rice acts as the perfect base, offering a mild, neutral flavor that complements the richness of the meat. Rice also has the ability to soak up sauces, broths, and seasonings, which makes it an ideal vehicle for the bold flavors in this dish.
- Tenderness of Thin-Sliced Beef: Thinly sliced beef cooks quickly, allowing it to stay tender and juicy. When paired with rice, it creates a satisfying texture contrast. The beef’s natural juiciness gets absorbed by the rice, infusing the entire bowl with flavor.
- Quick and Easy Preparation: The simplicity of this dish makes it a go-to for anyone looking to make a meal that is both quick and delicious. You can prepare the beef and rice in under 30 minutes, making it perfect for busy nights or meal prep.
2. Choosing the Right Cuts of Beef for a Beef and Rice Bowl
The success of a beef and rice bowl relies on selecting the right cut of beef. Thin slices are key for ensuring the beef cooks quickly and remains tender. Some excellent cuts to consider are:
- Flank Steak: This cut is perfect for stir-frying or grilling, and its thin, long strands of muscle make it easy to slice thinly. It has a slightly leaner texture but is full of flavor when cooked properly.
- Skirt Steak: Skirt steak is known for its flavorful and slightly chewy texture. Thinly slicing it against the grain enhances its tenderness and ensures a satisfying bite.
- Sirloin: A leaner cut with enough tenderness for stir-frying or pan-searing, sirloin beef works great for this dish, providing a milder, yet juicy texture.
- Ribeye: For a more luxurious and tender bowl, ribeye steak adds a rich, buttery texture to the dish, making it feel indulgent.
When preparing your beef, it’s important to slice against the grain to maximize tenderness, especially for leaner cuts that might otherwise become tough.
3. Key Ingredients for Beef and Rice Bowl
Creating a delicious beef and rice bowl requires the right combination of ingredients to build layers of flavor. These are some essential elements to include:
- Beef: As mentioned earlier, thin-sliced beef is key. You can either marinate it beforehand or cook it with simple seasonings for an easy option.
- Rice: White rice, brown rice, or jasmine rice are popular choices for beef and rice bowls. Each rice type offers a slightly different texture and flavor profile. Brown rice offers a nuttier taste and more fiber, while jasmine rice adds a subtle floral fragrance that enhances the dish’s aroma.
- Vegetables: Add a variety of fresh vegetables to provide color, texture, and nutrition. Consider using bell peppers, onions, broccoli, spinach, carrots, or snow peas. You can stir-fry or sauté them alongside the beef or simply serve them raw for added crunch.
- Sauces: The sauce is what elevates a beef and rice bowl to the next level. Some popular sauce options include:
- Teriyaki sauce for a sweet, savory flavor.
- Soy sauce or tamari for a salty, umami-packed base.
- Oyster sauce for a deeper, slightly sweet flavor.
- Chili paste or sriracha for those who like a spicy kick.
- A combination of garlic, ginger, and sesame oil adds an aromatic depth to the sauce.
- Garnishes: To finish the bowl, top it off with green onions, sesame seeds, and cilantro. A squeeze of lime or a dollop of yogurt or avocado adds brightness and creaminess to the dish.
4. How to Prepare Beef and Rice Bowls
The beauty of a beef and rice bowl is its ease of preparation. The key is to cook the rice while preparing the beef and vegetables so that everything is ready at the same time.
- Step 1: Cook the Rice: Start by cooking your chosen rice according to the package instructions. For extra flavor, consider cooking the rice in beef broth or adding a pinch of salt to the water. Keep the rice warm as you prepare the beef and veggies.
- Step 2: Cook the Beef: Heat a skillet or wok over medium-high heat. Add a splash of oil, and when it’s hot, add the thinly sliced beef. Stir-fry the beef for about 2-3 minutes, until it’s browned and cooked through. Add garlic and ginger if you’re using them, allowing them to cook for an additional 30 seconds to release their aromatic flavors.
- Step 3: Sauté the Vegetables: In the same pan, you can sauté your chosen vegetables until they are tender-crisp or lightly caramelized, depending on your preference. Alternatively, you can steam or blanch them to keep their texture intact.
- Step 4: Assemble the Bowl: Once everything is cooked, place a generous serving of rice into a bowl. Top the rice with the cooked beef, followed by the sautéed vegetables. Drizzle your chosen sauce over the top, and garnish with green onions, sesame seeds, and fresh herbs.
5. Optional Variations of Beef and Rice Bowl
A beef and rice bowl can be easily customized based on your dietary preferences or available ingredients. Here are some variations to consider:
- Spicy Beef and Rice Bowl: Add a generous drizzle of sriracha or chili oil to the sauce to spice things up. You can also incorporate pickled jalapeños or hot peppers for extra heat.
- Healthy Beef and Rice Bowl: For a healthier twist, opt for brown rice or quinoa as your base. Add extra veggies like spinach, kale, or avocado to boost the nutritional value of the bowl.
- Beef and Rice Bowl with Egg: For a more indulgent option, top your beef and rice bowl with a fried egg or poached egg. The runny yolk adds a rich creaminess that ties the dish together beautifully.
- Korean-style Beef and Rice Bowl (Bibimbap): Make a Korean-inspired version by serving the beef with gochujang (Korean chili paste), kimchi, and a fried egg. Add a variety of sautéed vegetables such as spinach, bean sprouts, and mushrooms for an authentic bibimbap experience.
6. Serving Suggestions for Beef and Rice Bowls
To make your beef and rice bowl a complete meal, consider pairing it with the following sides:
- Soup: A bowl of miso soup or egg drop soup complements the rice bowl nicely and adds a warming touch to the meal.
- Salad: A light, refreshing cucumber or seaweed salad works as a great contrast to the richness of the beef.
- Side of Pickles: A side of pickled vegetables, like kimchi, pickled radishes, or pickled carrots, adds a tangy bite that cuts through the richness of the beef.
The Beef and Rice Bowl is a customizable, quick, and satisfying meal that packs a punch of flavor in every bite. Whether you’re making it for a family dinner, a meal prep solution, or a weeknight treat, this dish is sure to please. With endless possibilities for toppings, sauces, and vegetable combinations, the beef and rice bowl can be made to suit any taste or dietary preference, making it a truly versatile meal.
Tips for Storing and Reheating Thin-Sliced Beef
Proper Storage Methods
Properly storing thin-sliced beef is essential to maintaining its quality, flavor, and safety. Whether you’re preparing it for meal prep or you’ve cooked extra to save for later, using the right storage methods ensures the beef stays fresh and delicious. Here’s a guide to storing thin-sliced beef at every stage—from fresh to cooked—and the best practices for keeping it safe and tasty.
1. Storing Fresh Thin-Sliced Beef
When you purchase fresh thin-sliced beef or prepare it for cooking, it’s crucial to store it properly to maintain its freshness and prevent spoilage. Here are some tips:
- Refrigeration: Fresh thin-sliced beef should be refrigerated immediately to prevent bacterial growth. Wrap the beef tightly in plastic wrap or place it in a resealable plastic bag. This helps to limit the exposure of the beef to air, which can cause it to dry out and lose flavor.
- Tip: You can also place the beef in an airtight container or use vacuum-seal bags to protect it from oxygen, which can degrade the beef’s quality and reduce its shelf life.
- Storage Time: Fresh thin-sliced beef can typically be stored in the refrigerator for 1 to 2 days. After this time, it may begin to spoil, so it’s best to use it quickly or freeze it if you’re not planning to cook it soon.
- Temperature: The refrigerator should be set at 40°F (4°C) or below to ensure that the beef stays safe and fresh. Be sure to keep your beef on the bottom shelf to prevent any potential cross-contamination with other foods.
- Use Within Recommended Timeframe: Always check the “sell by” or “use by” dates on beef packaging and make sure you use it within those dates. If the beef looks or smells off, discard it to avoid foodborne illness.
2. Freezing Thin-Sliced Beef for Long-Term Storage
If you don’t plan on using your thin-sliced beef within a few days, freezing is the best way to keep it fresh for a longer period. Freezing locks in the beef’s flavor and ensures it’s available for future meals. Follow these steps for optimal freezing:
- Vacuum Sealing: For the best results, use a vacuum sealer to seal the beef in air-tight bags. Vacuum sealing removes all air, preventing freezer burn and preserving the meat’s moisture and flavor. This method is ideal for longer storage, as it maintains the texture and taste of the beef for several months.
- Plastic Wrap and Freezer Bags: If you don’t have a vacuum sealer, wrap the thin-sliced beef tightly in plastic wrap and place it in a freezer-safe resealable bag. Try to remove as much air as possible from the bag to reduce the chances of freezer burn. You can also wrap the beef in aluminum foil before placing it in the freezer bag.
- Separating Portions: If you have a large quantity of thin-sliced beef, it’s helpful to separate the slices into individual portions before freezing. This makes it easier to thaw only the amount you need, reducing waste.
- Labeling: Always label your beef packages with the date of freezing. Thin-sliced beef can typically be frozen for 3 to 4 months without significant loss of quality. After this time, the beef may still be safe to eat but may lose some of its flavor and texture.
3. Storing Cooked Thin-Sliced Beef
If you’ve cooked thin-sliced beef and want to store it for later use, there are some key steps you should follow to maintain its taste and safety:
- Cool Down Quickly: Before storing cooked beef, allow it to cool to room temperature for no longer than 2 hours. This is important to prevent the growth of bacteria. If you need to cool it faster, you can place the beef in shallow containers to help it cool more quickly.
- Refrigeration: Once the beef has cooled, store it in an airtight container or wrap it tightly with plastic wrap. Make sure the container is sealed properly to prevent air from getting in and causing the beef to dry out.
- Storage Time: Cooked thin-sliced beef can be stored in the refrigerator for 3 to 4 days. If you’re not planning to use it within that time, it’s best to freeze it for later.
- Freezing Cooked Beef: If you want to store cooked thin-sliced beef for a longer period, freezing it is a good option. Place the beef in freezer-safe bags or containers. Be sure to remove excess air from the bags and wrap the beef tightly in plastic wrap before freezing to prevent freezer burn. When freezing cooked beef, it can last for up to 3 months.
4. Storing Leftovers
Thin-sliced beef leftovers, especially from meals like stir-fries or beef bowls, can be easily stored for future meals. To keep the flavors intact:
- Refrigerate Quickly: Refrigerate leftover thin-sliced beef within 2 hours of cooking to avoid bacterial growth. Store it in an airtight container to preserve its moisture.
- Freeze Leftovers: For longer storage, freezing is a great option. Place the leftover beef in freezer-safe bags or containers, and label them with the date so you can easily track when they were stored.
- Separate Sauces and Meats: If the beef was cooked with a sauce, it’s a good idea to store the beef and sauce separately in two containers. This prevents the beef from becoming soggy during storage.
5. Thawing and Reheating Frozen Thin-Sliced Beef
When you’re ready to use your frozen thin-sliced beef, it’s essential to thaw it properly to maintain its texture and flavor:
- Refrigerator Thawing: The best way to thaw frozen beef is to place it in the refrigerator overnight. This gradual thawing helps preserve the meat’s moisture and prevents bacteria from multiplying.
- Quick Thawing: If you’re in a rush, you can thaw the beef by placing it in a bowl of cold water (in a sealed bag) or using the microwave’s defrost setting. However, it’s important to cook the beef immediately after thawing to reduce any risk of bacterial growth.
6. General Storage Tips for Thin-Sliced Beef
- Avoid Cross-Contamination: Always store raw beef separately from other foods, especially ready-to-eat items like fruits and vegetables. This prevents the spread of harmful bacteria.
- Inspect Before Use: Always inspect stored beef for signs of spoilage. If it looks slimy, has an off smell, or has changed color significantly, it’s best to discard it.
- Don’t Overpack Your Fridge or Freezer: Make sure your refrigerator and freezer aren’t overcrowded, as this can prevent proper airflow and temperature regulation. This ensures the beef stays fresh longer.
Proper storage methods are crucial for keeping thin-sliced beef safe, flavorful, and tender. By following these guidelines, you can ensure that your beef stays at its best, whether it’s fresh, cooked, or frozen, and enjoy delicious meals every time!
Reheating Without Drying Out
Reheating thin-sliced beef can be tricky, as it’s easy for it to become tough, dry, and lose its flavor if not done properly. To ensure your beef retains its juiciness and tenderness after reheating, it’s important to use the right methods and take some extra steps to preserve its moisture. Here are several strategies and tips to help you reheat thin-sliced beef without drying it out:
1. Use Low Heat for Slow Reheating
One of the most important factors in reheating thin-sliced beef without drying it out is using low, gentle heat. High temperatures can cause the proteins in the beef to tighten, leading to a tough texture and loss of moisture. By reheating slowly, you can preserve the beef’s tenderness and flavor.
- Stovetop: When reheating on the stovetop, use medium-low heat to avoid overcooking the beef. Place the beef in a skillet or frying pan and heat it slowly, stirring occasionally. If you’re reheating a larger quantity, you can cover the pan with a lid to retain moisture and allow the beef to heat more evenly.
- Oven: Preheat your oven to a low temperature, around 250°F (120°C). Place the beef on a baking sheet and cover it loosely with aluminum foil. This will help trap moisture and allow the beef to reheat gently without drying out.
2. Add Moisture to Prevent Dryness
Reheating beef without moisture is a surefire way to end up with dry, chewy meat. To keep the beef juicy, consider adding a small amount of liquid to the beef while reheating.
- Broth or Stock: One of the best ways to add moisture is to use beef broth or stock. Pour a small amount of broth into the skillet or oven dish with the beef to help steam it during reheating. The broth adds flavor and keeps the beef moist.
- Water or Wine: If you don’t have broth on hand, you can use water or even a splash of red wine to keep the beef from drying out. These liquids help create steam, which keeps the beef tender while reheating.
- Sauce: If your beef was originally cooked in a sauce, such as a stir-fry or a beef stew, be sure to reheat it with the sauce. This helps maintain the beef’s moisture and enhances its flavor.
3. Reheat with Covering to Trap Moisture
To keep the heat trapped and prevent moisture from evaporating during the reheating process, it’s essential to cover the beef. Using a lid or aluminum foil helps maintain a consistent temperature and ensures the beef stays moist.
- Skillet Method: When reheating beef in a skillet, cover the pan with a tight-fitting lid. This helps keep the moisture inside, ensuring the beef doesn’t dry out. If the beef has been sliced thin, consider adding a small amount of liquid to the pan as well.
- Oven Method: When reheating in the oven, cover the beef with aluminum foil or place it in an oven-safe dish with a lid. The foil traps steam and moisture, preventing the beef from drying out as it reheats. You can also use a parchment paper layer under the foil for an added moisture barrier.
4. Use a Steaming Method
Steaming is another great way to reheat thin-sliced beef without losing moisture. By steaming, you ensure that the beef heats up gently and evenly, keeping its juices locked in.
- Steaming on the Stovetop: You can use a steam basket over a pot of simmering water to steam your beef. Place the beef in a heat-safe dish or directly in the basket (if sliced thin enough), and cover it with a lid. The steam gently reheats the beef while preserving its moisture.
- Microwave Steaming: For a faster steaming method, you can use the microwave. Place the beef in a microwave-safe dish, add a tablespoon of water or broth, and cover it loosely with a microwave-safe lid or plastic wrap. Heat it in short intervals, stirring gently between each, until it’s warm. The added liquid creates steam inside the container, keeping the beef moist.
5. Avoid Overheating the Beef
Overheating is one of the most common mistakes when reheating thin-sliced beef. As beef cooks, the proteins tighten, and the moisture is forced out. If you overheat it during reheating, the beef will dry out, becoming tough and unappetizing.
- Temperature Monitoring: Use a meat thermometer to keep track of the internal temperature of the beef while reheating. Thin-sliced beef is generally best reheated to around 130-140°F (54-60°C), depending on your desired doneness. Reheating beef to a higher temperature will result in dry, overcooked meat.
- Heat in Short Intervals: Instead of reheating beef for an extended period, warm it in short intervals, checking and stirring after each interval. This prevents overcooking and ensures the beef is heated evenly.
6. Sauté or Stir-Fry for Quick Reheating
If you want to add a bit of texture and flavor when reheating, consider stir-frying or sautéing your beef in a hot pan for a quick finish. This method is great for reheating beef strips or slices, especially when paired with vegetables or a sauce.
- Quick Sauté: Heat a small amount of oil or butter in a skillet over medium heat. Once hot, add the thin-sliced beef and cook for just 1-2 minutes, stirring frequently. This will help crisp up the edges and enhance the flavor without drying out the beef.
- Stir-Frying with Vegetables: For a more complete dish, add some vegetables, such as bell peppers, onions, or broccoli, to the skillet with the beef. This will not only reheat the beef but also infuse it with additional flavor and moisture from the veggies.
7. Avoid the Microwave (Unless Using Steaming)
While the microwave can be convenient for quick reheating, it tends to dry out beef and make it tough if not used properly. If you must use the microwave, remember to cover the beef with a microwave-safe cover, add some liquid to create steam, and reheat it in short intervals. But, for the best results, avoid using the microwave unless you’re steaming or reheating in small amounts.
Final Tips
- Test for Warmth: Always check the beef after reheating to ensure it has reached your desired temperature without overcooking. If it’s not hot enough, you can reheat it for a few more minutes, but be cautious to avoid further drying out.
- Serve Immediately: After reheating, serve the beef immediately while it’s still warm to enjoy the best texture and flavor.
Reheating thin-sliced beef without drying it out requires patience and the right techniques, but it’s well worth the effort. By using these methods, you can enjoy tender, juicy beef even when you’re reheating leftovers!
Make-Ahead Options for Meal Prepping
Meal prepping is a fantastic way to save time during the week and ensure you have healthy, flavorful meals ready to go. When it comes to thin-sliced beef, there are several make-ahead options that allow you to prepare your meals in advance, preserving both the flavor and texture of the beef. Whether you’re cooking for the week ahead or simply want to streamline your dinner prep, here are several ways to incorporate thin-sliced beef into your meal prep routine.
1. Marinate and Store in the Fridge
One of the easiest make-ahead options for thin-sliced beef is to marinate the beef ahead of time. Marinating not only enhances the flavor of the beef but also helps tenderize it, making it more flavorful and juicy once cooked.
- How to Marinate for Meal Prep: Place the thin-sliced beef in a resealable bag or airtight container, and pour your marinade of choice over the beef. Seal the bag or container, ensuring the beef is evenly coated with the marinade, and refrigerate for several hours or overnight. This step can be done for up to 2-3 days in advance. Some great marinades for thin-sliced beef include teriyaki, garlic soy sauce, and balsamic vinegar with herbs.
- Benefits: By marinating ahead of time, you cut down on cooking time when you’re ready to prepare your meal. The beef will already be infused with rich flavors and ready to cook.
2. Cook and Portion Out for the Week
Cooking thin-sliced beef in bulk and portioning it out for several meals is another great way to prepare ahead for the week. Once the beef is cooked, simply divide it into single-serving portions and store them in the fridge or freezer for easy access later. This method is particularly useful for dishes like stir-fries, tacos, or rice bowls.
- How to Cook for Meal Prep: After slicing and seasoning the beef, cook it as you normally would (stir-frying, grilling, or searing). Once cooked, let it cool down and portion it into individual containers or meal prep trays. Pair the beef with your preferred side dishes, like steamed vegetables, rice, or noodles.
- Storage Tips: Store the portioned meals in airtight containers in the fridge for up to 3-4 days or in the freezer for longer-term storage. If you plan to freeze the beef, ensure it’s fully cooled before storing it to avoid condensation and freezer burn.
- Benefit: Cooking the beef in advance saves you time during the week and ensures you always have a nutritious meal on hand. This method is ideal for busy days when you don’t have the time or energy to cook.
3. Freeze for Later Use
If you’re looking to meal prep for a longer period, freezing thin-sliced beef is an excellent option. Freezing the beef allows you to preserve its freshness and flavor for several weeks, and it can be cooked straight from the freezer with just a little thawing.
- How to Freeze Thin-Sliced Beef: After slicing the beef, portion it into freezer-safe bags or airtight containers. You can freeze the beef raw (with or without marinade) or cooked. Be sure to label the bags with the date and any additional notes, such as cooking instructions or seasoning used.
- Best Practices for Freezing: Lay the bags flat in the freezer to ensure the beef freezes evenly and can be easily stacked. For the best texture, try to use the beef within 2-3 months. To reheat, simply thaw the beef in the fridge overnight or use a quick-cook method like stir-frying or searing for frozen beef.
- Benefit: Freezing is the best option for long-term meal prep. It allows you to buy thin-sliced beef in bulk, prepare it in advance, and store it for several weeks, so you always have it on hand when you need it.
4. Pre-Cook and Assemble Meal Kits
Meal kits are another great option for meal prepping with thin-sliced beef. By assembling everything you need for a meal—such as pre-cooked beef, vegetables, grains, and sauces—into individual containers, you make it easy to throw together a quick, healthy meal. This approach works well for stir-fries, bowls, and fajitas.
- How to Assemble Meal Kits: Cook the thin-sliced beef and any accompanying ingredients (such as vegetables, rice, or noodles). Let everything cool, then portion out the ingredients into separate containers. For stir-fries, you might want to store the sauce separately to prevent sogginess.
- Storing the Kits: Seal the containers with airtight lids and store them in the fridge for up to 4 days. If you plan to freeze the meal kits, make sure the beef and vegetables are fully cooled before freezing, and freeze the sauces separately.
- Benefit: Meal kits make it easy to have everything prepared and ready to cook in minutes. On busy days, you can pull out a pre-assembled kit, cook it up in a skillet or oven, and have a complete meal in no time.
5. Use Pre-Cooked Beef in Soup or Stew
If you’re looking for a comforting meal prep option, pre-cooked thin-sliced beef can be added to soups or stews. The beef will soak up the flavors of the broth or sauce, making it a delicious addition to any one-pot dish.
- How to Use Thin-Sliced Beef in Soups: Cook the beef and set it aside. In a separate pot, prepare your soup or stew base (broth, vegetables, and spices). Once the soup or stew is simmering, add the cooked thin-sliced beef to the pot and cook for an additional 5-10 minutes to allow the beef to soak in the flavors.
- Storage Tips: Store any leftover soup or stew in an airtight container in the fridge for up to 3 days or freeze it for up to 3 months.
- Benefit: Soups and stews are great options for meal prepping with thin-sliced beef because they allow you to combine multiple ingredients into one hearty meal. Plus, they store well in the fridge or freezer, making them perfect for later use.
Final Thoughts on Meal Prepping with Thin-Sliced Beef
Meal prepping with thin-sliced beef is a fantastic way to ensure you have delicious, healthy meals ready to go throughout the week. Whether you choose to marinate and store, cook and portion, or assemble meal kits, these make-ahead options help you save time, reduce stress, and enjoy flavorful meals even on your busiest days. With a little planning, you can enjoy tender, juicy beef in a variety of dishes, from stir-fries to tacos, without the hassle of cooking every day.
Conclusion
Thin-sliced beef is an incredibly versatile and flavorful ingredient that can elevate a wide range of dishes, from stir-fries and tacos to grilled sandwiches and rice bowls. By understanding the best cuts of beef, the importance of proper slicing techniques, and using the right marinades and seasonings, you can create mouthwatering meals in no time. The cooking methods—whether you’re stir-frying, grilling, searing, or simmering—allow you to achieve the perfect texture and flavor every time.
Additionally, with the right storage and reheating techniques, you can easily incorporate thin-sliced beef into your meal prep routine, ensuring you have delicious, tender meals ready for busy days. Whether you choose to prepare thin-sliced beef for an evening dinner or batch-cook it for the week ahead, this ingredient is a fantastic way to save time without sacrificing taste.
So, whether you’re a seasoned chef or just starting out, experimenting with thin-sliced beef recipes offers endless opportunities to create satisfying, flavorful meals for any occasion. With a little preparation and creativity, you can enjoy delicious, restaurant-quality dishes right at home!
Are you ready to try this recipe?
There are no reviews yet. Be the first one to write one.