
“The Best Chicken Breast Recipes for Dinner: Simple and Satisfying”
When it comes to preparing a delicious and versatile dinner, chicken breast is a top choice for many home cooks. Its mild flavor and tender texture make it the perfect canvas for a variety of dishes, from hearty comfort meals to healthy, low-carb options. Whether you’re hosting a family gathering or whipping up a quick weekday dinner, chicken breast recipes offer endless possibilities to satisfy every craving. In this article, we’ll explore some of the best ways to transform this staple ingredient into mouthwatering dishes that are simple to make and guaranteed to impress. Let’s get cooking!
The Benefits of Cooking with Chicken Breast
Nutritional Value of Chicken Breast: High Protein, Low Fat
Chicken breast is celebrated for its outstanding nutritional profile, making it a favorite choice for those seeking a healthy and balanced diet. Packed with high-quality protein and naturally low in fat, it provides essential nutrients that fuel your body while supporting a variety of health goals.
High Protein Content
One of the standout features of chicken breast is its impressive protein content. A 3-ounce (85-gram) serving of cooked chicken breast contains around 26 grams of protein. Protein is a vital macronutrient that helps build and repair tissues, maintain muscle mass, and support immune function. For those looking to build strength, recover from workouts, or simply stay energized throughout the day, chicken breast is an excellent addition to the menu.
Naturally Low in Fat
In addition to being rich in protein, chicken breast is naturally low in fat, especially when compared to other cuts of meat. A typical 3-ounce serving contains about 3 grams of fat, with less than 1 gram being saturated fat. This makes it a heart-healthy option that fits well into a low-fat or calorie-conscious diet. By choosing skinless chicken breast, you can further reduce fat content while still enjoying its tender texture and delicious flavor.
Low in Calories, High in Nutrients
Chicken breast is not only low in fat but also relatively low in calories, making it a smart choice for those managing their weight. It is a nutrient-dense food, offering vital vitamins and minerals such as niacin (vitamin B3), phosphorus, and selenium. Niacin supports energy production and healthy skin, while phosphorus promotes strong bones and teeth. Selenium is a powerful antioxidant that helps combat oxidative stress and supports thyroid function.
Supports a Variety of Diets
Whether you follow a high-protein diet, are trying to lose weight, or just want to maintain a well-rounded eating plan, chicken breast is a versatile ingredient that can adapt to your needs. It pairs well with vegetables, grains, and healthy fats, making it suitable for low-carb, keto, paleo, and balanced diets alike.
By incorporating chicken breast into your dinner recipes, you’re choosing a nutritious and satisfying ingredient that can help you meet your health and wellness goals without sacrificing flavor.
Versatility for Various Cuisines and Flavors
Chicken breast is one of the most versatile ingredients in the culinary world, capable of seamlessly adapting to countless cuisines, cooking techniques, and flavor profiles. Its mild flavor and tender texture act as a blank canvas, allowing you to infuse it with seasonings, marinades, and spices to suit any taste or cultural cuisine. Whether you’re preparing a quick weeknight meal or an elaborate feast, chicken breast offers endless possibilities.
Perfect for Global Cuisines
Chicken breast can effortlessly transition between dishes inspired by diverse culinary traditions. For example:
- Asian Cuisine: Transform it into a stir-fry with soy sauce, ginger, and garlic, or marinate it in teriyaki or sesame flavors for a delightful grilled dish.
- Mediterranean Cuisine: Pair it with olive oil, lemon, oregano, and garlic for a classic Greek-inspired recipe, or use it as the base for a hearty chicken shawarma.
- Mexican Cuisine: Season chicken breast with a blend of chili powder, cumin, and paprika to create tacos, enchiladas, or burrito fillings.
- Italian Cuisine: Use it in creamy Alfredo pasta, a traditional chicken Parmesan, or bake it with tomatoes, basil, and mozzarella for a Caprese-inspired dish.
- American Comfort Food: Think classic fried chicken, savory casseroles, or BBQ-style grilled chicken breasts topped with your favorite sauce.
Easily Adaptable Cooking Methods
Chicken breast can be prepared using a variety of cooking techniques, each bringing out unique flavors and textures:
- Grilling: Perfect for achieving a smoky, charred flavor while keeping the meat juicy.
- Baking: Ideal for creating a healthy and low-maintenance dish that can be seasoned in endless ways.
- Pan-Seared: A quick way to develop a golden crust while locking in moisture.
- Poaching: Excellent for shredding into salads, soups, or sandwiches.
- Air Frying: A healthier alternative for crispy chicken breast without excess oil.
Compatible with Diverse Flavor Profiles
Because of its neutral taste, chicken breast easily takes on the flavors of marinades, rubs, and sauces. Whether you crave something sweet, spicy, tangy, or savory, it can be adjusted to your preference. Experiment with flavors like honey mustard, lemon pepper, spicy buffalo, or creamy garlic to create dishes that suit your mood and palate.
Ideal for Customization
Chicken breast is not only versatile for various cuisines but also highly customizable to dietary needs. It can be served as a low-carb option alongside roasted vegetables, a protein-packed topping for a grain bowl, or as the centerpiece of a hearty salad.
Perfect for Any Occasion
From casual family dinners to elegant dinner parties, chicken breast recipes can be tailored to suit any occasion. Dress it up with gourmet sauces and sides for a formal presentation or keep it simple for a cozy, no-fuss meal at home.
With its unmatched ability to adapt to different cuisines, flavors, and cooking methods, chicken breast is a true kitchen staple that guarantees variety and creativity in your meals.
Easy Cooking Methods for Busy Weeknights
On hectic weeknights, when time is limited but you still want to enjoy a delicious and nutritious meal, chicken breast is the perfect solution. Its quick cooking time and versatile nature make it a go-to ingredient for fast and easy dinners. Whether you’re looking for a simple recipe to get dinner on the table in 30 minutes or less or want a low-maintenance method that requires minimal effort, chicken breast has you covered. Let’s explore some easy cooking methods that save you time while still delivering flavor-packed meals.
1. Grilling
Grilling chicken breast is one of the fastest and simplest ways to cook it, especially during warmer months. Preheat the grill, season the chicken with your favorite spices or marinade, and grill for 6-8 minutes per side until the meat is cooked through. The grill adds a smoky, charred flavor to the chicken, making it an excellent choice for a quick, tasty dinner. Pair it with a side of grilled veggies or a simple salad for a balanced meal.
2. Baking
Baking is an easy, hands-off cooking method for busy weeknights. Simply season the chicken breasts with olive oil, herbs, and spices, place them on a baking sheet, and bake at 400°F (200°C) for 20-25 minutes. For added convenience, you can prepare a tray of chicken breasts and bake them all at once, saving time and effort. Baking also allows you to cook in larger batches, which is perfect for meal prepping or leftovers. You can even add a variety of vegetables to the baking sheet for a one-pan meal.
3. Pan-Searing
Pan-searing chicken breasts is a quick and easy way to lock in flavor while creating a crispy exterior. Heat a bit of oil in a skillet over medium-high heat, season the chicken, and sear for 4-5 minutes on each side until golden brown and cooked through. This method gives you a nice balance of crispy texture on the outside and juicy tenderness on the inside. You can finish the chicken with a quick sauce, like a lemon garlic butter or balsamic glaze, for extra flavor without much additional effort.
4. Sheet Pan Dinners
Sheet pan meals are an excellent choice when you want minimal cleanup and maximum flavor. Arrange seasoned chicken breasts and your favorite veggies (like potatoes, carrots, or bell peppers) on a baking sheet, drizzle with olive oil, and roast in the oven at 400°F (200°C) for 20-30 minutes. This all-in-one meal comes together easily and requires very little hands-on preparation, making it perfect for a busy weeknight.
5. Slow Cooker
If you have a bit more time in the morning or early afternoon, using a slow cooker can make dinner even easier. Simply add boneless, skinless chicken breasts to the slow cooker with your favorite sauce, broth, or seasonings, and let it cook on low for 4-6 hours. The chicken will become incredibly tender and flavorful, perfect for shredding and serving with rice, in tacos, or as a filling for sandwiches. Slow cookers are perfect for preparing meals ahead of time with little effort.
6. Air Frying
For those who prefer a healthier alternative to frying, the air fryer is a fantastic tool for quick and easy chicken breast cooking. Season the chicken breasts, spray with a little oil, and air fry at 375°F (190°C) for 15-20 minutes, flipping halfway through. The air fryer creates a crispy exterior while keeping the inside juicy, and it requires less oil than traditional frying. Plus, it cooks chicken breast much faster than an oven, making it ideal for busy weeknights.
7. One-Pot or One-Pan Meals
For an even quicker dinner option, try one-pot or one-pan chicken breast recipes. These dishes are simple to prepare and require minimal cleanup. Cook chicken breasts along with your choice of vegetables, grains (like rice or quinoa), or pasta all in one pot or pan. The flavors meld together as the chicken cooks, making for a delicious and satisfying meal with minimal effort.
8. Poaching
Poaching chicken breast is another easy and gentle cooking method that ensures the chicken stays tender and moist. Place the chicken breasts in a pot with enough water or broth to cover them, bring it to a simmer, and cook for 15-20 minutes. Once poached, the chicken can be shredded for use in salads, sandwiches, or tacos. This method is especially helpful when you want to prepare chicken in advance for multiple meals throughout the week.
When you’re short on time but still want a flavorful and healthy dinner, chicken breast offers a variety of easy cooking methods to choose from. Whether you’re grilling, baking, air frying, or using a slow cooker, there’s a method that fits every schedule and every taste preference. With these quick and simple techniques, you can enjoy a satisfying dinner without spending hours in the kitchen.
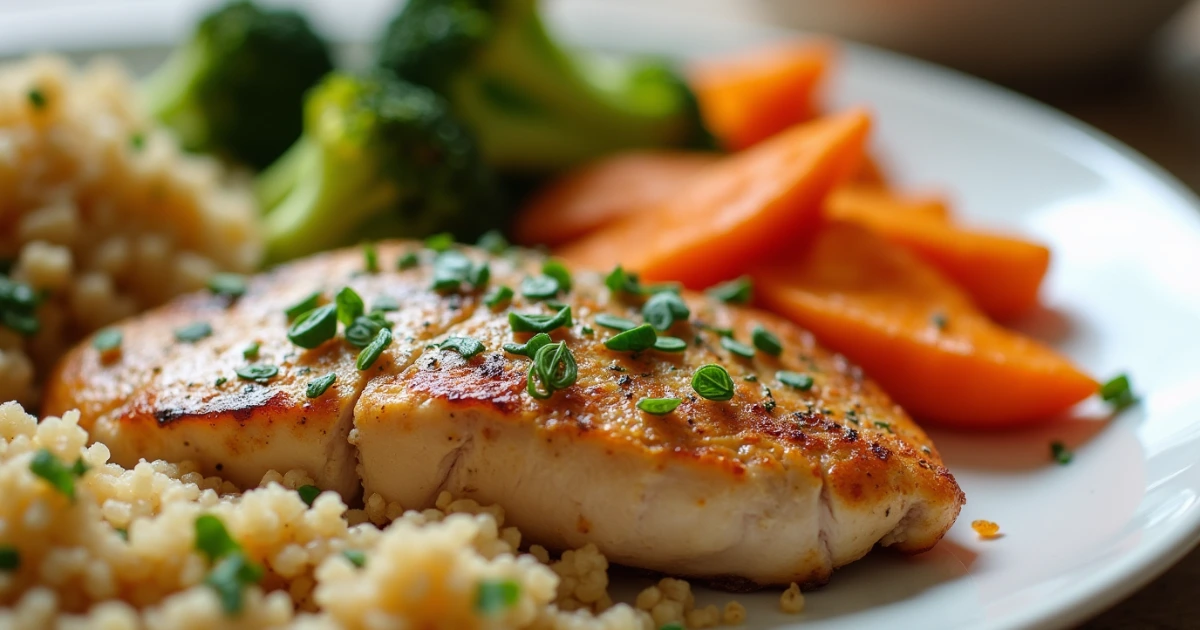
Easy Baked Chicken Breast Recipes for Dinner

Classic Oven-Baked Chicken Breast Recipes for Dinner
Baking chicken breasts in the oven is one of the simplest and most reliable ways to achieve tender, juicy, and flavorful results with minimal effort. Whether you’re a beginner cook or a seasoned chef, this classic oven-baked chicken breast recipe is a perfect go-to for busy weeknights or meal prep. The key to success with oven-baked chicken breasts lies in the right seasoning, temperature, and cooking time. Here’s a step-by-step guide to make this dish a staple in your kitchen.
Ingredients:
- 2 boneless, skinless chicken breasts
- 2 tablespoons olive oil
- 1 teaspoon garlic powder
- 1 teaspoon onion powder
- 1 teaspoon dried thyme or Italian seasoning
- Salt and pepper, to taste
- Fresh herbs (optional, for garnish)
Instructions:
- Preheat the Oven
Start by preheating your oven to 400°F (200°C). This high heat will help the chicken breast cook evenly while keeping it juicy and flavorful. - Prepare the Chicken Breasts
Pat the chicken breasts dry with paper towels to remove any excess moisture. This will help the seasoning stick and ensure a nice, crisp exterior. - Season the Chicken
Drizzle olive oil over both sides of the chicken breasts. Use a brush or your hands to evenly coat the chicken. Then, sprinkle garlic powder, onion powder, dried thyme (or Italian seasoning), salt, and pepper over both sides. Feel free to customize the seasoning to suit your preferences. You can add paprika for a smoky flavor, or a squeeze of lemon juice for a citrusy twist. - Place on a Baking Sheet
Place the seasoned chicken breasts on a baking sheet lined with parchment paper or a silicone baking mat for easy cleanup. Make sure there’s some space between each piece to ensure even cooking. - Bake the Chicken
Put the baking sheet in the preheated oven and bake for 20-25 minutes. The exact cooking time will depend on the size and thickness of your chicken breasts. A good rule of thumb is to cook them for about 20 minutes, then check the internal temperature using a meat thermometer. Chicken breasts should reach an internal temperature of 165°F (75°C) to be fully cooked. - Rest the Chicken
Once the chicken has reached the desired temperature, remove it from the oven and let it rest for about 5 minutes. This allows the juices to redistribute within the meat, keeping it moist and tender. - Serve and Enjoy
After resting, slice the chicken breast against the grain and serve with your favorite sides. This classic oven-baked chicken breast pairs wonderfully with roasted vegetables, mashed potatoes, or a simple salad.
Tips for Perfect Oven-Baked Chicken Breasts:
- Pounding the Chicken (Optional): For even cooking, you can gently pound the chicken breasts to an even thickness using a meat mallet. This step ensures that the chicken cooks uniformly, preventing the thinner parts from drying out while the thicker portions cook through.
- Use a Meat Thermometer: To avoid overcooking, using a meat thermometer is the most reliable method to ensure your chicken reaches the perfect temperature.
- Customize the Seasoning: The beauty of this recipe lies in its versatility. You can tailor the seasoning to your taste, using ingredients like paprika, chili powder, lemon zest, or fresh herbs like rosemary and thyme.
- Marinating the Chicken (Optional): For extra flavor, you can marinate the chicken for 30 minutes to an hour before baking. A marinade made with olive oil, lemon juice, garlic, and herbs will enhance the chicken’s flavor and tenderness.
Why This Recipe is Perfect for Busy Weeknights:
This classic oven-baked chicken breast recipe is perfect for busy weeknights because it’s simple, quick, and hands-off. With minimal prep time and only a short cooking time, you can have a delicious and healthy dinner ready in about 30 minutes. The recipe is also great for meal prepping, as baked chicken breasts can be stored in the fridge for up to 4 days and used in salads, sandwiches, or wraps throughout the week.
The classic oven-baked chicken breast recipe is an easy, foolproof method to prepare a tasty, nutritious meal without spending too much time in the kitchen. With just a few simple ingredients and basic cooking techniques, you can achieve a perfectly cooked chicken breast that will satisfy your family and guests alike. This recipe is customizable, versatile, and guaranteed to be a staple in your cooking rotation.
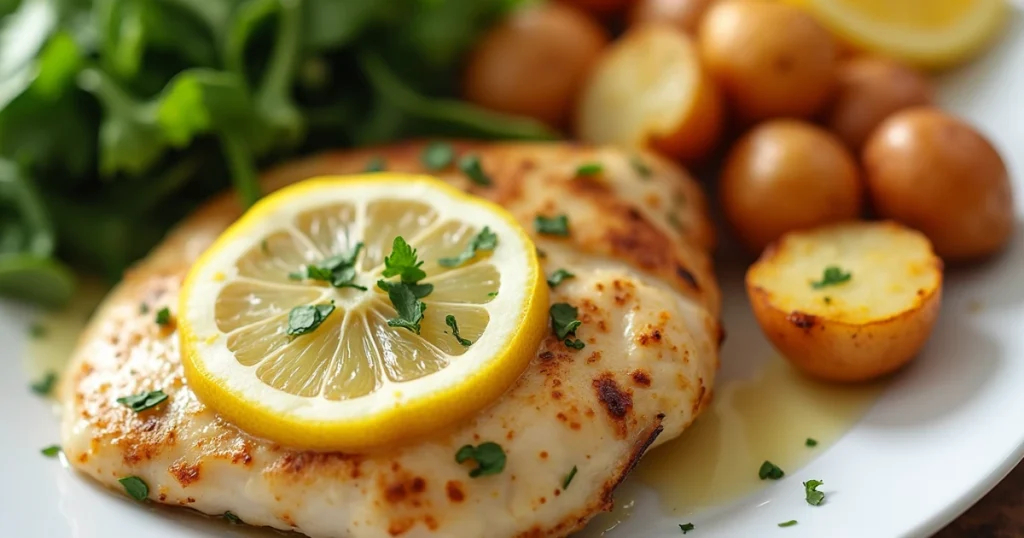
Lemon Garlic Baked Chicken Breast
Lemon garlic baked chicken breast is a refreshing and flavorful dish that combines the bright, zesty taste of lemon with the savory richness of garlic. This recipe is perfect for anyone looking for a healthy, easy-to-make meal that’s packed with flavor. The combination of citrus and garlic complements the natural taste of the chicken, making it a crowd-pleasing option for weeknight dinners, meal prep, or even a special occasion. Let’s break down how to make this delicious dish step by step.
Ingredients:
- 2 boneless, skinless chicken breasts
- 2 tablespoons olive oil
- 4 cloves garlic, minced
- Juice and zest of 1 lemon
- 1 teaspoon dried thyme or rosemary
- Salt and pepper, to taste
- Fresh parsley or basil (optional, for garnish)
Instructions:
- Preheat the Oven
Start by preheating your oven to 400°F (200°C). This high temperature helps cook the chicken quickly while allowing the flavors to develop and intensify. - Prepare the Chicken
Pat the chicken breasts dry with paper towels to ensure the seasonings stick and the chicken cooks evenly. You can also lightly pound the chicken breasts to an even thickness to prevent overcooking the thinner sections. - Make the Lemon Garlic Marinade
In a small bowl, combine the olive oil, minced garlic, lemon juice, lemon zest, dried thyme (or rosemary), salt, and pepper. Mix well to combine. The olive oil helps the chicken stay moist while the lemon adds brightness and acidity. The garlic infuses the chicken with its savory flavor. - Marinate the Chicken
Place the chicken breasts in a shallow dish or a resealable plastic bag and pour the lemon garlic marinade over them. Make sure the chicken is well coated. For the best flavor, let the chicken marinate for at least 15-30 minutes. If you have more time, marinate it for up to 2 hours in the refrigerator to allow the flavors to penetrate the meat more deeply. - Bake the Chicken
Transfer the marinated chicken breasts to a baking dish. If you prefer, you can line the dish with parchment paper or a silicone mat to prevent sticking and make cleanup easier. Bake in the preheated oven for 20-25 minutes, or until the chicken reaches an internal temperature of 165°F (75°C) and the juices run clear. The baking time will vary depending on the size and thickness of the chicken breasts, so it’s important to check for doneness with a meat thermometer. - Rest the Chicken
Once the chicken is fully cooked, remove it from the oven and let it rest for 5 minutes. Resting the chicken allows the juices to redistribute, ensuring the meat remains moist and tender. - Serve and Garnish
Slice the chicken breasts against the grain and serve with your favorite sides. A squeeze of fresh lemon juice over the top enhances the citrus flavor. Garnish with freshly chopped parsley or basil for a touch of color and added freshness.
Tips for the Best Lemon Garlic Baked Chicken Breast:
- Don’t Over-Marinate: While marinating adds flavor, it’s important not to over-marinate the chicken, especially with acidic ingredients like lemon juice. Marinating for 30 minutes to an hour is usually sufficient to enhance the flavor without overpowering the meat.
- Add Extra Flavor: For an extra burst of flavor, consider adding a tablespoon of Dijon mustard or honey to the marinade. Dijon mustard adds a subtle tang, while honey brings a touch of sweetness that balances the acidity of the lemon.
- Use Fresh Garlic: While pre-minced garlic can be convenient, fresh garlic cloves provide a more aromatic, flavorful result. If you prefer a milder garlic taste, reduce the amount of garlic in the recipe.
- Baking Dish Alternative: If you don’t want to use a baking dish, you can also cook the chicken breasts on a sheet pan lined with parchment paper. This method creates a slight crispness on the edges, adding texture to the dish.
Why Lemon Garlic Baked Chicken Breast is Perfect for Busy Weeknights:
Lemon garlic baked chicken breast is ideal for busy weeknights because it requires minimal preparation and cooking time. The marinade is simple to make, and you can even prepare it in advance to save time. Baking the chicken allows you to set it and forget it, so you can focus on other tasks or get a head start on preparing side dishes. Plus, the bright flavors make the meal feel light and refreshing, even on the busiest days.
Variations and Serving Suggestions:
This dish can be paired with a variety of sides to create a well-rounded meal:
- Vegetables: Serve with roasted vegetables like asparagus, zucchini, or bell peppers for a healthy and colorful plate.
- Grains: Serve the chicken over a bed of rice, quinoa, or couscous for a satisfying meal that incorporates whole grains.
- Salads: Pair the lemon garlic chicken with a crisp green salad for a lighter option. Try adding arugula, spinach, or mixed greens with a lemon vinaigrette for a cohesive flavor profile.
Lemon garlic baked chicken breast is a versatile and simple recipe that delivers fresh, bold flavors with minimal effort. The bright citrus and aromatic garlic create a deliciously balanced dish that pairs well with a variety of sides. Whether you’re cooking for a busy weeknight dinner or preparing a meal ahead of time, this recipe is guaranteed to impress with its ease and vibrant taste.
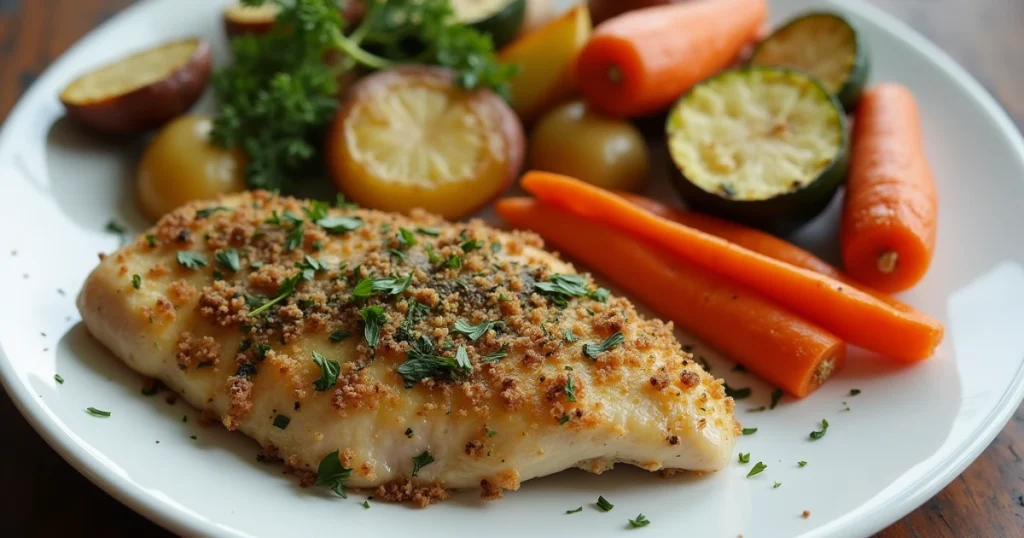
Herb-Crusted Chicken Breast
Herb-crusted chicken breast is a flavorful and visually appealing dish that brings the best of fresh herbs and a crispy, golden crust to every bite. This recipe is perfect for those who enjoy rich, savory flavors with a hint of freshness. The combination of herbs creates a delightful crust that enhances the natural flavor of the chicken while keeping it moist and tender inside. Whether you’re preparing a special meal for guests or looking for an easy weeknight dinner, herb-crusted chicken breast is a guaranteed crowd-pleaser.
Ingredients:
- 2 boneless, skinless chicken breasts
- 1/4 cup breadcrumbs (preferably panko for extra crunch)
- 2 tablespoons fresh parsley, chopped
- 2 tablespoons fresh thyme, chopped
- 1 tablespoon fresh rosemary, chopped
- 1/2 teaspoon garlic powder
- 1/4 teaspoon onion powder
- 1 tablespoon Dijon mustard
- 1 tablespoon olive oil
- Salt and pepper, to taste
- Fresh lemon wedges (optional, for serving)
Instructions:
- Preheat the Oven
Begin by preheating your oven to 375°F (190°C). This temperature allows the chicken to cook through while ensuring the herb crust becomes golden and crispy without burning. - Prepare the Chicken
Pat the chicken breasts dry with paper towels to remove any excess moisture. This step ensures that the crust adheres well to the chicken. You can also lightly pound the chicken to an even thickness to promote even cooking. - Make the Herb Crust Mixture
In a small bowl, combine the breadcrumbs, chopped parsley, thyme, rosemary, garlic powder, and onion powder. Stir the mixture to distribute the herbs evenly throughout the breadcrumbs. You can also add a pinch of red pepper flakes for a slight kick or some lemon zest for an additional layer of freshness. - Season the Chicken
Season the chicken breasts with salt and pepper on both sides to bring out the flavors. Then, brush a thin layer of Dijon mustard on the top side of the chicken. The mustard not only adds a slight tang but also helps the herb crust stick to the chicken. - Coat the Chicken
Press the mustard-coated side of each chicken breast into the herb and breadcrumb mixture, ensuring it is well-coated on all sides. The breadcrumbs should form a light, crunchy layer on top of the chicken, with the fresh herbs providing added flavor and texture. - Bake the Chicken
Place the coated chicken breasts on a lightly greased baking sheet or in a shallow baking dish. Drizzle olive oil over the top of the chicken to help the crust crisp up and develop a golden color. Bake the chicken in the preheated oven for 25-30 minutes, or until the internal temperature reaches 165°F (75°C). The crust should be crispy and golden, while the chicken remains juicy and tender. - Rest the Chicken
Once cooked, remove the chicken from the oven and let it rest for 5 minutes. This resting period allows the juices to redistribute, ensuring the chicken stays moist and flavorful. - Serve and Garnish
Serve the herb-crusted chicken with a squeeze of fresh lemon for a burst of citrus that complements the herbs. Garnish with extra chopped fresh parsley or thyme for an elegant finish. This dish pairs wonderfully with roasted vegetables, a fresh salad, or a side of mashed potatoes.
Tips for Perfect Herb-Crusted Chicken Breast:
- Use Fresh Herbs: Fresh herbs are key to achieving the vibrant flavor of this dish. While dried herbs can be substituted in a pinch, fresh herbs provide the most aromatic and flavorful results. If fresh herbs aren’t available, try to use a combination of dried herbs that are rich in flavor, such as dried rosemary or thyme.
- Customize the Herb Mix: The beauty of this recipe lies in its versatility. You can mix and match herbs according to your taste. For example, basil, oregano, or tarragon can add different flavor profiles. Feel free to experiment with your favorite herbs.
- Ensure the Crust Sticks: The Dijon mustard acts as an adhesive for the herb crust. If you find that the crust isn’t sticking as well as you’d like, you can try adding a little bit of olive oil or even a beaten egg to the breadcrumbs before coating the chicken.
- Use Panko Breadcrumbs: For a light, crunchy texture, panko breadcrumbs work best. They are coarser and toast up better in the oven compared to regular breadcrumbs. However, if you prefer a finer texture, you can use traditional breadcrumbs as well.
- Serve with a Sauce: While the herb-crusted chicken is full of flavor on its own, you can also serve it with a complementary sauce, such as a lemon garlic butter sauce, balsamic glaze, or a creamy mustard sauce, for added richness.
Why Herb-Crusted Chicken Breast is a Great Choice:
Herb-crusted chicken breast is a wonderful option for dinner because it is both easy to prepare and packed with flavor. The fresh herbs create a crispy crust that contrasts beautifully with the tender, juicy chicken inside. This recipe is also very customizable—whether you want to add a little spice, more herbs, or even cheese to the crust, the possibilities are endless. The dish looks elegant and sophisticated, making it perfect for dinner parties or special family meals, while still being simple enough for weeknight cooking.
Variations and Serving Suggestions:
- Add Cheese: For an extra layer of flavor, sprinkle grated Parmesan or mozzarella cheese on top of the herb crust before baking. The cheese will melt into the breadcrumbs and form a rich, savory layer.
- Roasted Vegetables: Pair your herb-crusted chicken with roasted vegetables like carrots, sweet potatoes, or Brussels sprouts. The earthy flavors of the vegetables complement the fragrant herbs on the chicken.
- Rice or Grains: Serve the herb-crusted chicken alongside a flavorful rice dish, quinoa, or couscous. A lemon-infused rice would particularly pair well with the dish’s fresh herbs.
- Fresh Salad: A crisp green salad with a light vinaigrette will balance the richness of the chicken and offer a refreshing contrast.
Herb-crusted chicken breast is an easy, yet impressive dish that combines the freshness of herbs with the savory flavor of crispy breadcrumbs. Whether you’re looking for a healthy meal or a dish that feels like a special treat, this recipe offers versatility and deliciousness in every bite. With just a few simple ingredients and steps, you can create a satisfying and flavorful meal that will become a regular in your dinner rotation.
Healthy Grilled Chicken Breast Ideas
Simple Grilled Chicken Breast with Olive Oil and Herbs
Simple grilled chicken breast with olive oil and herbs is a classic, flavorful dish that’s both easy to make and packed with delicious, fresh ingredients. Perfect for a quick weeknight meal or a backyard barbecue, this recipe focuses on highlighting the natural taste of the chicken with the perfect balance of olive oil and aromatic herbs. The olive oil helps the chicken stay moist and juicy, while the herbs infuse the meat with vibrant flavors, creating a dish that’s both satisfying and healthy.
Ingredients:
- 2 boneless, skinless chicken breasts
- 2 tablespoons olive oil
- 1 tablespoon fresh rosemary, chopped (or 1 teaspoon dried)
- 1 tablespoon fresh thyme, chopped (or 1 teaspoon dried)
- 1 tablespoon fresh parsley, chopped
- 1 teaspoon garlic powder
- 1 teaspoon onion powder
- Salt and pepper, to taste
- Fresh lemon wedges (optional, for serving)
Instructions:
- Prepare the Chicken
Begin by preparing the chicken breasts. Pat them dry with paper towels to remove any excess moisture. This step is essential for achieving a nice sear on the grill. If the chicken breasts are uneven in thickness, you can pound them to an even thickness to ensure even cooking. - Make the Herb Marinade
In a small bowl, mix together the olive oil, rosemary, thyme, parsley, garlic powder, onion powder, salt, and pepper. The olive oil serves as the base of the marinade, while the herbs and spices provide a fragrant, savory flavor that complements the natural taste of the chicken. - Marinate the Chicken
Coat the chicken breasts with the herb mixture, making sure each side is well-covered. For the best results, let the chicken marinate for at least 15 minutes, though marinating for 30 minutes to 2 hours in the refrigerator will enhance the flavor even more. If you’re in a rush, you can grill the chicken immediately after coating it, but marinating allows the herbs to penetrate the meat, resulting in a more flavorful dish. - Preheat the Grill
While the chicken marinates, preheat your grill to medium-high heat (around 375°F or 190°C). You can also use a grill pan on the stove if you don’t have access to an outdoor grill. Make sure the grill grates are clean, and lightly oil them to prevent the chicken from sticking. - Grill the Chicken
Once the grill is hot, place the chicken breasts on the grates. Grill the chicken for about 6-7 minutes per side, or until it reaches an internal temperature of 165°F (75°C). The chicken should have nice grill marks, and the outside should be slightly crispy, while the inside remains tender and juicy. If you’re grilling thicker breasts, you may need to cook them a little longer, but be careful not to overcook them, as chicken breasts can dry out quickly. - Rest the Chicken
After grilling, remove the chicken from the grill and let it rest for 5 minutes. Resting the chicken allows the juices to redistribute throughout the meat, ensuring a moist and flavorful bite. - Serve and Garnish
Serve the grilled chicken breasts with your favorite sides. A squeeze of fresh lemon over the top can add a bright, citrusy finish. Garnish with additional fresh herbs, like parsley or thyme, to enhance the dish’s vibrant appearance and flavor.
Tips for Perfect Grilled Chicken Breast with Olive Oil and Herbs:
- Use Fresh Herbs: While dried herbs can work in a pinch, fresh herbs provide a much more aromatic, vibrant flavor. If you prefer dried herbs, use about one-third of the amount as a substitute.
- Oil the Grill Grates: To prevent the chicken from sticking to the grill, brush the grates with a bit of olive oil or spray them with a non-stick cooking spray before heating them up.
- Monitor Internal Temperature: The most accurate way to ensure your chicken is cooked perfectly is to use a meat thermometer. Chicken should be cooked to an internal temperature of 165°F (75°C) for safe consumption, but this will also keep the chicken moist.
- Variation in Herbs: Feel free to customize the herb blend to suit your tastes. Basil, oregano, and tarragon are excellent alternatives to rosemary and thyme. You can even add a little bit of chili powder or paprika for a smoky, spicy kick.
Why Simple Grilled Chicken Breast with Olive Oil and Herbs is Perfect:
This recipe is ideal for a simple, yet flavorful meal. Grilling the chicken enhances its natural flavors, and the combination of olive oil and fresh herbs creates a delicious crust on the outside while keeping the inside juicy. It’s a great choice for those looking for a healthy, lean protein option without sacrificing taste. Plus, it’s incredibly versatile—serve it with roasted vegetables, a light salad, or even as a sandwich or wrap with your favorite toppings.
Variations and Serving Suggestions:
- Vegetable Pairings: Grilled chicken goes wonderfully with a variety of vegetables. Serve it alongside grilled vegetables like zucchini, bell peppers, or asparagus for a healthy, colorful meal.
- Rice or Grains: A side of rice or quinoa pairs perfectly with this grilled chicken. You can even make a simple lemon-infused rice for a complementary flavor.
- Pasta: For a more filling option, serve the grilled chicken over a bed of pasta. A simple pasta with olive oil, garlic, and fresh herbs would go beautifully with the grilled chicken.
- Sauces: If you like a little extra flavor, drizzle the chicken with a simple sauce like tzatziki, chimichurri, or a balsamic glaze for a different twist.
Simple grilled chicken breast with olive oil and herbs is a versatile, easy-to-make dish that’s perfect for any occasion. Whether you’re looking for a quick weeknight meal or a dish to serve at your next outdoor barbecue, this recipe is sure to impress. With just a few basic ingredients and simple grilling techniques, you can create a delicious, healthy meal that’s full of flavor and sure to satisfy.
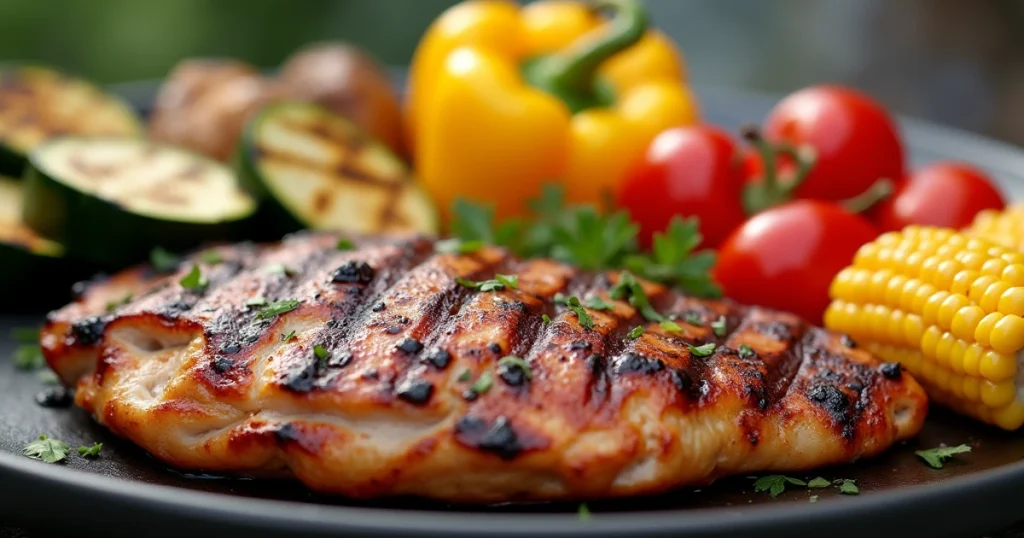
BBQ-Style Grilled Chicken with Low-Sugar Sauce
BBQ-style grilled chicken with low-sugar sauce is a healthier take on the classic, mouthwatering BBQ chicken. The smoky, charred flavor of the grilled chicken combined with a tangy, slightly sweet, and rich low-sugar BBQ sauce offers a satisfying meal without all the excess sugar found in traditional BBQ sauces. Perfect for those who want to enjoy the savory goodness of BBQ chicken without compromising on health, this recipe delivers the best of both worlds—flavor and nutrition.
Ingredients:
- 4 boneless, skinless chicken breasts
- 1/2 cup low-sugar BBQ sauce (store-bought or homemade)
- 1 tablespoon olive oil
- 1 tablespoon apple cider vinegar
- 1 teaspoon smoked paprika
- 1/2 teaspoon garlic powder
- 1/2 teaspoon onion powder
- Salt and pepper, to taste
- Fresh cilantro or parsley (optional, for garnish)
- Lemon wedges (optional, for serving)
Instructions:
- Prepare the Chicken
Start by preparing the chicken breasts. Use a paper towel to pat the chicken dry, removing any moisture. This ensures the BBQ sauce sticks well to the chicken. You can also lightly pound the chicken to an even thickness if desired, ensuring it cooks evenly on the grill. - Marinate the Chicken
In a small bowl, mix together the olive oil, apple cider vinegar, smoked paprika, garlic powder, onion powder, salt, and pepper. Rub this marinade evenly over the chicken breasts. This step helps infuse the chicken with flavor and tenderizes the meat. Let the chicken marinate for at least 20 minutes, or up to 2 hours in the refrigerator for the best results. If you’re short on time, you can proceed immediately, but marinating helps deepen the flavor. - Preheat the Grill
Preheat your grill to medium-high heat (around 375°F or 190°C). Clean the grill grates and lightly oil them to prevent the chicken from sticking. This step is essential for achieving those beautiful grill marks and a crispy crust. - Grill the Chicken
Once the grill is hot, place the marinated chicken breasts on the grates. Grill the chicken for 6-7 minutes per side, or until the internal temperature reaches 165°F (75°C). Avoid flipping the chicken too often; let it sear properly on each side to lock in the juices. The chicken should have a nice char and grill marks while staying moist inside. - Glaze with BBQ Sauce
During the last 2-3 minutes of grilling, brush a thin layer of low-sugar BBQ sauce over the chicken breasts. This will allow the sauce to caramelize slightly and infuse the chicken with its rich, tangy flavor. Be sure not to add the sauce too early, as the sugars in the sauce can burn on the grill. - Rest the Chicken
After grilling, remove the chicken from the grill and let it rest for 5 minutes. This helps the juices redistribute throughout the meat, ensuring the chicken stays juicy and tender when you cut into it. - Serve and Garnish
Serve the BBQ-style grilled chicken with a fresh squeeze of lemon juice to brighten up the flavors. Garnish with chopped cilantro or parsley for an added burst of color and freshness. This dish pairs wonderfully with a side of grilled vegetables, a leafy green salad, or a refreshing coleslaw.
Tips for Perfect BBQ-Style Grilled Chicken with Low-Sugar Sauce:
- Homemade Low-Sugar BBQ Sauce: If you want to control the sugar content and flavors in your BBQ sauce, try making your own. Combine tomato paste, apple cider vinegar, mustard, garlic powder, onion powder, smoked paprika, and a natural sweetener like stevia or erythritol. Adjust the sweetness and spice levels to suit your preferences.
- Don’t Overcook the Chicken: Chicken breast can dry out quickly on the grill, so use a meat thermometer to check for doneness. Remove the chicken from the grill when it reaches 165°F (75°C) to avoid overcooking.
- Extra Flavor: If you like your BBQ sauce with a little extra kick, try adding some hot sauce, cayenne pepper, or chili flakes to your low-sugar sauce. This will give your grilled chicken a spicy finish.
- Grill Marks and Char: To achieve those perfect grill marks, resist the urge to move the chicken around too much on the grill. Let it sit undisturbed for a few minutes before flipping it over.
- Resting the Chicken: Letting the chicken rest after grilling is essential. It allows the juices to redistribute and ensures that your chicken remains moist and tender.
Why BBQ-Style Grilled Chicken with Low-Sugar Sauce is a Great Choice:
This recipe is perfect for those who love the bold flavors of BBQ chicken but want to avoid the excess sugar found in traditional BBQ sauces. The low-sugar BBQ sauce provides all the tangy, smoky goodness without the added sugars, making it a healthier alternative. Grilling the chicken adds a layer of smoky flavor and crispy texture, making this dish a satisfying and guilt-free option for any BBQ lover.
Variations and Serving Suggestions:
- Side Dishes: BBQ chicken pairs well with a variety of sides. Try it with roasted sweet potatoes, grilled corn on the cob, or a hearty quinoa salad for a balanced meal.
- Coleslaw: A light, tangy coleslaw made with a vinegar-based dressing would complement the richness of the BBQ chicken, adding a refreshing crunch.
- Sandwich or Wrap: For a more casual meal, serve the grilled BBQ chicken on a whole-grain bun or wrap it in a tortilla. Top it with some fresh greens, pickles, and extra BBQ sauce for a delicious handheld meal.
- Grilled Vegetables: Pairing your BBQ chicken with grilled vegetables like bell peppers, zucchini, and onions will add a healthy and colorful touch to your meal.
- Spicy BBQ Sauce: If you like your BBQ with a spicy kick, mix some hot sauce into your low-sugar BBQ sauce. This will add an extra layer of flavor and heat to the dish.
BBQ-style grilled chicken with low-sugar sauce is a fantastic, healthier alternative to traditional BBQ chicken. With a smoky, juicy chicken breast topped with a tangy and flavorful low-sugar BBQ sauce, this dish satisfies all your BBQ cravings without all the added sugar. Whether you’re cooking for a family dinner or grilling for a weekend barbecue, this recipe is sure to be a hit. It’s simple, healthy, and bursting with flavor!
Mediterranean Grilled Chicken Breast
Mediterranean grilled chicken breast is a vibrant and flavorful dish that combines the healthy, fresh ingredients typical of Mediterranean cuisine. The lean protein from the chicken, paired with the tangy, aromatic marinades and seasonings, creates a deliciously light yet satisfying meal. This recipe brings together the rich flavors of olive oil, lemon, garlic, oregano, and fresh herbs, transporting your taste buds to the sunny shores of the Mediterranean with every bite. Whether you’re looking for a simple weeknight dinner or a healthy addition to a Mediterranean-inspired feast, this recipe is a perfect choice.
Ingredients:
- 4 boneless, skinless chicken breasts
- 3 tablespoons olive oil
- Juice of 1 lemon
- 2 cloves garlic, minced
- 1 teaspoon dried oregano
- 1 teaspoon ground cumin (optional for extra depth)
- 1/2 teaspoon paprika
- 1/4 teaspoon ground black pepper
- Salt, to taste
- 1 tablespoon fresh parsley, chopped (for garnish)
- 1 tablespoon fresh mint, chopped (optional, for garnish)
- Lemon wedges (for serving)
Instructions:
- Prepare the Chicken
Start by preparing the chicken breasts. Pat the chicken dry with paper towels to ensure the marinade adheres better. If the breasts are uneven in thickness, you can pound them to an even thickness for more consistent cooking. - Make the Mediterranean Marinade
In a bowl, combine the olive oil, lemon juice, minced garlic, dried oregano, cumin, paprika, salt, and black pepper. Whisk the ingredients together until well mixed. The olive oil and lemon juice form a base that helps tenderize the chicken, while the oregano and garlic infuse the meat with Mediterranean flavors. - Marinate the Chicken
Place the chicken breasts in a shallow dish or a resealable plastic bag and pour the marinade over them. Seal the dish or bag and refrigerate the chicken for at least 30 minutes, or up to 4 hours for deeper flavor. If you’re in a rush, you can marinate for a shorter time, but letting the chicken soak in the marinade will give it a richer, more robust flavor. - Preheat the Grill
While the chicken marinates, preheat your grill to medium-high heat (around 375°F or 190°C). Clean the grill grates and brush them lightly with olive oil to prevent the chicken from sticking. This step will ensure the chicken gets a nice sear and grill marks. - Grill the Chicken
Once the grill is hot, place the marinated chicken breasts on the grates. Grill the chicken for about 6-7 minutes per side, or until the internal temperature reaches 165°F (75°C). The chicken should have beautiful grill marks and a slightly crispy exterior, while the inside remains juicy and tender. To ensure the chicken is cooked evenly, avoid moving it around on the grill too much. - Rest the Chicken
After grilling, remove the chicken breasts from the grill and let them rest for 5 minutes. Resting the meat allows the juices to redistribute, keeping the chicken moist and flavorful. - Serve and Garnish
Slice the chicken breasts and serve them on a platter. Garnish with freshly chopped parsley and mint for an added layer of freshness and a burst of color. Serve with lemon wedges on the side for an extra tangy kick that complements the grilled flavors.
Tips for Perfect Mediterranean Grilled Chicken Breast:
- Customize the Marinade: The beauty of Mediterranean cuisine is its flexibility. Feel free to add other spices like coriander, thyme, or rosemary to the marinade, depending on your taste preferences. You can also swap the cumin for a bit of ground cinnamon for a more exotic flavor.
- Use Fresh Herbs: If possible, opt for fresh oregano, parsley, and mint. Fresh herbs give the chicken a more fragrant, vibrant taste compared to dried ones.
- Don’t Overcook the Chicken: As with all grilled chicken, be mindful of the cooking time. Chicken breast can dry out quickly, so using a meat thermometer is a good way to ensure the chicken reaches the perfect 165°F (75°C) internal temperature.
- Grilled Vegetables: Serve this Mediterranean grilled chicken with a side of grilled vegetables like zucchini, eggplant, bell peppers, or cherry tomatoes for a complete Mediterranean meal. You can also toss them in olive oil, lemon juice, and herbs before grilling to complement the chicken.
- Marinate Longer for More Flavor: While 30 minutes of marinating is enough, longer marinating (up to 4 hours) will allow the flavors to penetrate the chicken more deeply, resulting in an even more flavorful dish.
Why Mediterranean Grilled Chicken Breast is a Great Choice:
Mediterranean grilled chicken breast is a fantastic option for anyone looking for a healthy, satisfying meal. The marinade’s blend of olive oil, lemon, garlic, and herbs provides a rich, complex flavor profile without the need for heavy sauces or excessive calories. It’s a nutrient-dense meal packed with lean protein, healthy fats, and antioxidants, making it a perfect choice for a light, nourishing dinner. The use of fresh, wholesome ingredients is key to bringing out the best in this dish, making it a delicious option for health-conscious individuals.
Variations and Serving Suggestions:
- Mediterranean Salad: Pair the grilled chicken with a fresh Mediterranean salad, which could include ingredients like cucumber, cherry tomatoes, Kalamata olives, red onion, and feta cheese, dressed with olive oil and lemon juice. This would make a refreshing and light meal.
- Pita Bread or Flatbread: Serve the chicken alongside pita bread or flatbread for a more filling meal. You can create a Mediterranean-style wrap by adding a bit of hummus or tzatziki sauce for extra flavor.
- Grain Bowl: For a heartier meal, serve the grilled chicken over a bed of couscous, quinoa, or farro. Top with a drizzle of olive oil, lemon zest, and some fresh herbs for a satisfying grain bowl.
- Yogurt Sauce: A tangy yogurt-based sauce, like tzatziki, would pair perfectly with the grilled chicken, offering a creamy and refreshing contrast to the smoky, herb-infused chicken.
Mediterranean grilled chicken breast is a delicious, healthy, and easy-to-make dish that brings the vibrant flavors of the Mediterranean right to your table. The combination of olive oil, lemon, garlic, and herbs creates a wonderfully flavorful marinade that tenderizes the chicken while infusing it with rich, aromatic flavors. Whether you serve it with vegetables, a salad, or some pita bread, this recipe is perfect for anyone looking for a light yet satisfying meal full of fresh, wholesome ingredients.
One-Pan Chicken Breast Dinners for Busy Nights
Chicken and Vegetable Sheet Pan Dinner
A chicken and vegetable sheet pan dinner is the ultimate easy, one-pan meal that brings together tender, juicy chicken and a colorful assortment of roasted vegetables, all cooked on a single sheet pan for minimal cleanup. This recipe is perfect for busy weeknights when you need a wholesome, nutritious dinner without spending too much time in the kitchen. The key to a successful sheet pan dinner lies in balancing flavors, textures, and cooking times to create a harmonious meal that’s both delicious and nutritious. It’s a versatile recipe that can be customized with your favorite vegetables and seasonings, making it a go-to dish for any occasion.
Ingredients:
- 4 boneless, skinless chicken breasts (or thighs)
- 1 tablespoon olive oil (for the chicken)
- 1 teaspoon garlic powder
- 1 teaspoon paprika
- 1/2 teaspoon dried thyme
- 1/2 teaspoon dried rosemary
- Salt and pepper, to taste
- 1 red bell pepper, sliced
- 1 yellow bell pepper, sliced
- 1 medium zucchini, sliced
- 1 medium red onion, sliced
- 1 cup baby carrots, halved or left whole
- 1 tablespoon olive oil (for vegetables)
- 1/2 teaspoon ground cumin (optional)
- Fresh parsley, chopped (for garnish)
Instructions:
- Preheat the Oven
Begin by preheating your oven to 400°F (200°C). A high temperature is crucial for roasting the chicken and vegetables evenly and ensuring they become tender with a bit of caramelization. - Prepare the Chicken
Pat the chicken breasts dry with paper towels. This helps the seasonings stick better. Drizzle the chicken with 1 tablespoon of olive oil, then season it with garlic powder, paprika, dried thyme, dried rosemary, salt, and pepper. Make sure the chicken is well coated with the seasonings. - Prepare the Vegetables
Place the sliced bell peppers, zucchini, red onion, and baby carrots on a large sheet pan. Drizzle the vegetables with 1 tablespoon of olive oil, then season with salt, pepper, and ground cumin (if using). Toss the vegetables well to coat them evenly in the oil and seasonings. - Arrange the Chicken and Vegetables on the Sheet Pan
Move the vegetables to the edges of the sheet pan to create space in the center for the chicken. Lay the seasoned chicken breasts in the center of the pan, ensuring the chicken and vegetables are spread out in a single layer for even cooking. - Roast in the Oven
Place the sheet pan in the preheated oven and roast for 25-30 minutes, or until the chicken reaches an internal temperature of 165°F (75°C) and the vegetables are tender. Depending on the size of the chicken breasts and vegetables, you may need to adjust the cooking time slightly. If the vegetables start to get too brown before the chicken is done, you can cover the pan loosely with foil to prevent over-browning. - Serve and Garnish
Once the chicken and vegetables are cooked, remove the sheet pan from the oven and let it rest for a few minutes before serving. Garnish with freshly chopped parsley for a burst of freshness and color. - Enjoy
Serve the chicken and roasted vegetables as a complete meal or pair with your favorite grains like quinoa, rice, or couscous for extra fiber and nutrition.
Tips for the Perfect Chicken and Vegetable Sheet Pan Dinner:
- Choose Vegetables That Roast Well: Root vegetables like potatoes, carrots, and sweet potatoes work particularly well in sheet pan dinners as they take longer to cook and can hold up to the heat. Softer vegetables like zucchini and bell peppers will cook faster, so be mindful of this when selecting your veggies.
- Customize the Seasonings: This recipe is incredibly versatile when it comes to seasonings. Try adding a bit of lemon zest and rosemary for a Mediterranean flair or sprinkle on some chili powder and cumin for a Southwest twist. You can also add garlic or a drizzle of balsamic vinegar for additional flavor.
- Use Chicken Thighs for More Juiciness: If you prefer a more flavorful and juicier option, substitute chicken thighs for the breasts. Thighs have more fat, making them perfect for sheet pan dinners as they stay moist and tender during roasting.
- Use Parchment Paper or Aluminum Foil: To make cleanup even easier, line your sheet pan with parchment paper or aluminum foil. This prevents the chicken and vegetables from sticking to the pan, and cleanup will be a breeze.
- Add Fresh Herbs After Roasting: While dried herbs are great for seasoning before roasting, fresh herbs like parsley, basil, or thyme should be added after the dish comes out of the oven to preserve their vibrant flavor and color.
- Don’t Overcrowd the Pan: Be sure not to overcrowd the sheet pan. The vegetables need room to roast and caramelize, so keep them in a single layer. If necessary, use two sheet pans to ensure even cooking.
- Use Leftovers: This sheet pan dinner is great for meal prepping or using up leftover vegetables. Simply store the leftover chicken and vegetables in an airtight container and reheat them in the microwave or oven the next day for a quick and easy lunch.
Why Chicken and Vegetable Sheet Pan Dinner is a Great Choice:
This dish is the epitome of simplicity and nutrition. It combines lean protein from the chicken with a variety of colorful, nutrient-dense vegetables, making it a balanced, wholesome meal that satisfies both the body and the taste buds. The sheet pan method makes cooking and cleaning up a breeze, while the roasting process intensifies the flavors of both the chicken and vegetables. Whether you’re feeding a family or preparing lunch for the week, this recipe is sure to become a staple in your meal rotation.
Variations and Serving Suggestions:
- Add Grains or Legumes: For a more filling meal, serve the chicken and vegetables over a bed of quinoa, brown rice, or couscous. Alternatively, toss some chickpeas or lentils with the vegetables for an added protein boost.
- Top with Cheese: After roasting, sprinkle the chicken and vegetables with crumbled feta, goat cheese, or Parmesan for a rich, savory flavor. The cheese will melt slightly on the hot vegetables, adding creaminess to the dish.
- Add a Sauce: For extra flavor, drizzle a simple sauce over the chicken and vegetables. A creamy tahini sauce, pesto, or yogurt-based sauce would be a great addition, enhancing the Mediterranean flavors of the dish.
- Serve with a Side Salad: Pair this sheet pan dinner with a light side salad made with mixed greens, cucumber, and a lemon-olive oil dressing for a refreshing contrast to the roasted flavors.
Chicken and vegetable sheet pan dinner is an easy, healthy, and flavorful meal that can be customized to fit your tastes. With minimal preparation and cleanup, this one-pan dinner is a perfect option for busy nights when you want a nutritious, satisfying meal. The versatility of the recipe allows you to switch up the vegetables and seasonings to keep things interesting, while the roasting process brings out the natural sweetness and depth of flavor in both the chicken and veggies. It’s a family-friendly meal that works for any occasion!
Skillet Chicken Breast with Spinach and Mushrooms
A skillet chicken breast with spinach and mushrooms is a simple, yet incredibly flavorful dish that combines the lean protein of chicken with the earthy richness of mushrooms and the nutrient-packed benefits of spinach. This one-pan recipe is quick and easy to prepare, making it perfect for busy weeknights when you want something healthy, satisfying, and delicious without a lot of effort. The chicken is pan-seared to golden perfection, while the spinach and mushrooms cook down to create a savory, velvety sauce that brings the whole dish together.
Ingredients:
- 4 boneless, skinless chicken breasts
- 2 tablespoons olive oil (for cooking)
- Salt and pepper, to taste
- 1 teaspoon garlic powder
- 1/2 teaspoon onion powder
- 1/2 teaspoon dried thyme
- 1 tablespoon butter
- 1 medium onion, thinly sliced
- 2 cups fresh mushrooms, sliced (such as cremini or white button mushrooms)
- 3 cups fresh spinach, washed and chopped
- 2 cloves garlic, minced
- 1/4 cup chicken broth (or white wine for a richer flavor)
- 1/4 cup heavy cream (or half-and-half for a lighter option)
- Fresh parsley, chopped (for garnish)
Instructions:
- Prepare the Chicken Breasts
Pat the chicken breasts dry with paper towels to ensure they sear properly. Season both sides with salt, pepper, garlic powder, onion powder, and dried thyme, making sure the chicken is evenly coated with the seasonings. - Cook the Chicken
In a large skillet, heat 1 tablespoon of olive oil over medium-high heat. Add the chicken breasts to the pan and cook for 5-7 minutes on each side, or until the chicken is golden brown and the internal temperature reaches 165°F (75°C). Remove the chicken from the skillet and set it aside on a plate, covering it loosely with foil to keep it warm. - Sauté the Vegetables
In the same skillet, add another tablespoon of olive oil and the butter. Allow the butter to melt, then add the sliced onions and cook for about 2-3 minutes, stirring occasionally, until the onions become soft and translucent. Add the sliced mushrooms to the skillet and sauté them for 5-7 minutes until they release their moisture and become golden brown. - Add Garlic and Spinach
Add the minced garlic to the skillet and cook for about 30 seconds, just until fragrant. Then, add the spinach to the pan and stir it in, allowing it to wilt down for 1-2 minutes. The spinach will cook quickly and shrink as it wilts. - Create the Sauce
Pour in the chicken broth (or white wine) and bring the mixture to a simmer. Scrape the bottom of the pan with a wooden spoon to loosen any flavorful brown bits from the chicken. Once the broth has reduced slightly, stir in the heavy cream (or half-and-half) and let the sauce simmer for an additional 3-4 minutes until it thickens slightly. - Return the Chicken to the Skillet
Place the seared chicken breasts back into the skillet with the spinach and mushroom mixture. Spoon some of the sauce over the chicken and let everything simmer together for another 2-3 minutes, allowing the chicken to absorb some of the flavors and heat through. - Serve and Garnish
Once everything is cooked, remove the skillet from the heat. Garnish the dish with freshly chopped parsley for a pop of color and freshness. Serve the skillet chicken breast with spinach and mushrooms on its own or with a side of your favorite grains like quinoa, rice, or mashed potatoes for a complete meal.
Tips for Perfect Skillet Chicken Breast with Spinach and Mushrooms:
- Use Fresh Spinach: Fresh spinach wilts much better and has a more vibrant flavor compared to frozen spinach. If using frozen spinach, make sure to thaw and drain it well to avoid excess moisture in the dish.
- Customize the Mushrooms: Different types of mushrooms will add varying flavors and textures to the dish. Cremini mushrooms have a slightly deeper, richer flavor than white mushrooms, while shiitake mushrooms will add an earthy, umami-packed twist. Experiment with a mix of mushrooms to enhance the dish.
- For Extra Creaminess: If you prefer a richer sauce, you can add more heavy cream or even a dollop of cream cheese to the sauce to give it an even creamier texture.
- Add a Splash of Lemon: A squeeze of fresh lemon juice at the end of cooking can brighten up the rich, creamy sauce and provide a nice balance to the savory flavors.
- Make it Spicy: If you enjoy a little heat, sprinkle in some red pepper flakes when cooking the mushrooms or add a dash of hot sauce to the cream sauce for an extra kick.
- Make It Low-Carb: For a low-carb variation, serve the chicken and vegetables over a bed of cauliflower rice or zucchini noodles instead of grains.
- Leftover Tip: This dish makes great leftovers! Simply store the chicken and vegetables in an airtight container in the fridge for up to 3 days. Reheat it gently in the microwave or on the stove, adding a splash of broth or cream to loosen the sauce.
Why Skillet Chicken Breast with Spinach and Mushrooms is a Great Meal:
This skillet chicken breast with spinach and mushrooms is a well-balanced, nutrient-dense meal that provides a good mix of protein, healthy fats, and vitamins. Chicken is an excellent source of lean protein, which is essential for muscle growth and repair. Spinach is packed with vitamins A, C, and K, as well as iron and calcium, which support your immune system and bone health. Mushrooms are rich in antioxidants and help support a healthy immune system.
What makes this recipe stand out is the rich and creamy sauce that ties everything together, elevating the dish from simple to decadent. The earthy mushrooms complement the spinach and chicken beautifully, while the heavy cream creates a luxurious sauce that coats each bite. It’s a comforting dish that feels indulgent but is still light enough for a weekday dinner.
Variations and Serving Suggestions:
- Add Bacon: For extra flavor, cook some crumbled bacon and sprinkle it over the dish before serving. The smoky crunch of bacon pairs wonderfully with the creamy sauce and chicken.
- Serve with a Side Salad: Pair this dish with a fresh, crisp salad made with mixed greens, cherry tomatoes, and a tangy vinaigrette for a light and refreshing contrast to the rich skillet chicken.
- Top with Cheese: If you love cheese, sprinkle some grated Parmesan or crumbled feta on top of the dish just before serving for an extra savory layer.
- Add More Vegetables: If you want to boost the vegetable content, try adding other vegetables like roasted bell peppers, artichoke hearts, or asparagus to the skillet, providing even more flavor and nutrients.
- Serve Over Pasta: For a heartier option, serve the chicken and vegetables over a bed of whole-wheat pasta or spaghetti squash for a comforting meal that feels like a treat.
Skillet chicken breast with spinach and mushrooms is a versatile, quick, and delicious dinner that is perfect for busy weeknights. With minimal preparation and a one-pan cooking method, it’s an easy way to enjoy a satisfying meal packed with flavor and nutrients. The creamy sauce, tender chicken, and earthy vegetables make this dish a standout, and its adaptability allows for plenty of variations to suit your preferences. Whether you’re feeding your family or cooking for one, this recipe is sure to become a favorite in your meal rotation.
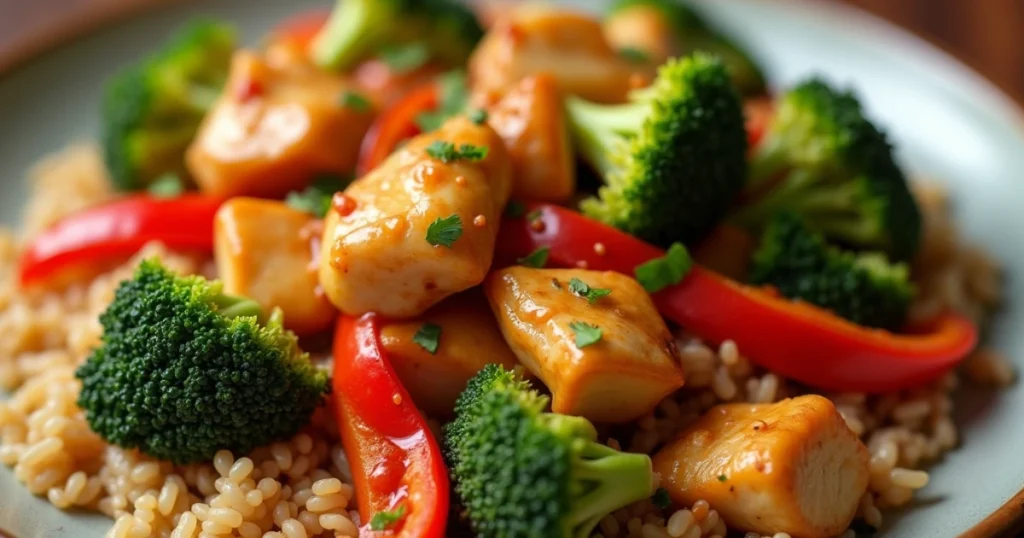
Chicken Stir-Fry with Broccoli and Peppers
Chicken stir-fry with broccoli and peppers is a quick, colorful, and nutritious dish that’s perfect for busy weeknights. It combines tender chicken breast with vibrant vegetables, all coated in a savory, slightly sweet sauce. This dish comes together in under 30 minutes, making it an excellent choice for a wholesome dinner that doesn’t sacrifice flavor.
Why You’ll Love This Recipe:
- Fast and Convenient: Minimal prep and quick cooking make it ideal for hectic days.
- Nutritious: Packed with lean protein from the chicken and vitamins from the broccoli and peppers.
- Customizable: Easily swap out vegetables or adjust seasonings to suit your preferences.
- Balanced Flavors: The combination of savory soy sauce, aromatic garlic, and ginger with a hint of sweetness creates a perfectly balanced dish.
Ingredients You’ll Need:
- Chicken breast: Sliced into thin, bite-sized strips for even cooking.
- Broccoli florets: Adds a satisfying crunch and plenty of nutrients like vitamin C.
- Bell peppers: Use a mix of red, yellow, or green peppers for sweetness and color.
- Soy sauce: The base for a classic stir-fry flavor.
- Garlic and ginger: Essential for creating depth and aroma in the dish.
- Honey or brown sugar: Balances the saltiness of the soy sauce with a touch of sweetness.
- Cornstarch: Helps thicken the sauce, giving it that glossy, restaurant-style finish.
- Sesame oil (optional): For added richness and a nutty aroma.
Step-by-Step Instructions:
- Prep the Ingredients:
- Slice the chicken breast into thin strips and season lightly with salt and pepper.
- Wash and chop the broccoli into small florets. Slice the bell peppers into thin strips. Mince the garlic and ginger.
- Make the Sauce:
- In a small bowl, whisk together soy sauce, honey (or brown sugar), a splash of water, and cornstarch. Set aside.
- Cook the Chicken:
- Heat a large skillet or wok over medium-high heat and add a drizzle of oil.
- Stir-fry the chicken until it’s golden brown and fully cooked, about 4–5 minutes. Remove from the pan and set aside.
- Stir-Fry the Vegetables:
- In the same pan, add a bit more oil and sauté the broccoli and bell peppers for 3–4 minutes, until tender-crisp.
- Combine and Finish:
- Return the chicken to the pan. Pour in the prepared sauce and stir until everything is well-coated and the sauce thickens slightly.
- Optional: Drizzle with a touch of sesame oil for extra flavor.
- Serve:
- Serve hot over steamed rice, noodles, or quinoa. Garnish with sesame seeds or chopped green onions if desired.
Pro Tips for Success:
- Prep Ahead: Chop all your ingredients and mix the sauce before you start cooking; stir-fry recipes move fast!
- Don’t Overcrowd the Pan: Work in batches if necessary to ensure the chicken and vegetables cook evenly.
- Make It Spicy: Add a pinch of red pepper flakes or a splash of sriracha to the sauce for a spicy kick.
- Meal Prep: This dish stores well in the fridge for up to 3 days, making it a great option for weekly meal prep.
Why It Works:
The combination of tender chicken, crunchy broccoli, and sweet bell peppers creates a delightful mix of textures and flavors. The homemade sauce ties everything together, offering a healthier alternative to takeout stir-fry. Plus, this recipe is versatile—you can swap in your favorite vegetables or even tofu for a vegetarian version.
Tips for Cooking the Perfect Chicken Breast Every Time
How to Properly Season Chicken Breast for Any Recipe
Seasoning chicken breast is an essential step in creating flavorful and satisfying dishes. Proper seasoning enhances the natural taste of the chicken and complements the overall flavor profile of your recipe. Here’s a detailed guide to help you master the art of seasoning chicken breast for any recipe or cooking method.
Why Seasoning Matters:
Chicken breast is naturally lean and mild in flavor, making it the perfect blank canvas for a variety of dishes. However, its low fat content can sometimes result in bland or dry outcomes if not seasoned correctly. A well-seasoned chicken breast ensures every bite is packed with flavor, whether it’s baked, grilled, stir-fried, or pan-seared.
Steps to Properly Season Chicken Breast:
- Prepare the Chicken Breast:
- Start by patting the chicken dry with a paper towel. Removing excess moisture helps the seasoning adhere better and promotes even cooking, especially when grilling or searing.
- Choose the Right Seasoning Base:
- Use a neutral oil, such as olive oil or avocado oil, to help spices stick to the chicken. Lightly coat the chicken with oil before applying your seasonings.
- Salt is Key:
- Salt is the foundation of good seasoning. Use kosher salt or sea salt for better coverage and control. A general rule of thumb is to use about 1 teaspoon of salt per pound of chicken.
- Layer with Additional Flavors:
- Basic Seasoning Blend: Black pepper, garlic powder, onion powder, and paprika are great for everyday recipes.
- Herbs and Aromatics: Add dried or fresh herbs like thyme, rosemary, oregano, or parsley for extra depth.
- Global Spice Blends:
- Mexican: Chili powder, cumin, and smoked paprika.
- Italian: Italian seasoning, garlic powder, and red pepper flakes.
- Asian: Ginger, soy sauce, and a dash of sesame oil.
- Mediterranean: Lemon zest, oregano, and za’atar.
- Use Acidic Ingredients for Balance:
- Incorporate ingredients like lemon juice, lime juice, or vinegar for brightness and tenderization. These work particularly well in marinades.
- Don’t Forget the Inside:
- If butterflying or stuffing the chicken breast, season the inside as well to ensure every bite is flavorful.
Methods for Seasoning Chicken Breast:
- Dry Rubs:
- Combine your spices and herbs in a small bowl and rub the mixture evenly over the chicken. This is perfect for grilling, baking, or pan-searing.
- Marinades:
- Create a liquid marinade using oil, acid (like citrus juice or vinegar), and spices. Let the chicken soak for 30 minutes to 4 hours for maximum flavor infusion.
- Brining:
- For exceptionally juicy chicken, try brining. Soak the chicken in a mixture of water, salt, and optional aromatics (like bay leaves or peppercorns) for at least 30 minutes before cooking.
Tips for Perfect Seasoning Every Time:
- Don’t Overdo It: Too much seasoning can overwhelm the natural flavor of the chicken. Aim for balance.
- Season Right Before Cooking: For a bold flavor on the surface, season just before cooking. For deeper flavor, let the chicken rest with the seasoning for 30 minutes to an hour.
- Taste and Adjust: Always taste-test the seasoning blend before applying it to the chicken. This ensures it aligns with your flavor preferences.
- Use Fresh Spices: Check the expiration dates on your spices. Fresh spices have a more potent flavor and will enhance your dishes significantly.
Common Mistakes to Avoid:
- Skipping Salt: Forgetting salt results in bland chicken, no matter how many other spices you use.
- Overloading with Spices: Using too many spices can mask the flavor of the chicken. Stick to a few complementary flavors.
- Uneven Seasoning: Ensure the seasoning is evenly distributed over the entire surface of the chicken.
Examples of Seasoning for Popular Recipes:
- For Baking: A mix of paprika, garlic powder, onion powder, and thyme.
- For Grilling: Olive oil, lemon zest, oregano, and black pepper.
- For Stir-Fry: Soy sauce, garlic, ginger, and a touch of honey or sesame oil.
- For Mediterranean Dishes: A rub of za’atar, olive oil, and sumac.
Properly seasoning chicken breast transforms a simple ingredient into a flavorful masterpiece. With these tips, you’ll never have to worry about bland chicken again—your meals will always be vibrant, balanced, and delicious!
Cooking Techniques: Baking, Grilling, Pan-Searing
Chicken breast is a versatile protein that can be prepared using a variety of cooking techniques, each delivering unique textures and flavors. Whether you prefer tender baked chicken, smoky grilled flavors, or a crisp, golden crust from pan-searing, understanding these methods will help you achieve perfect results every time.
Baking: The Easiest Way to Cook Juicy Chicken Breast
Why Bake?
Baking chicken breast is a hands-off method that’s ideal for meal prep or weeknight dinners. It allows for even cooking, retains moisture, and is perfect for incorporating marinades or dry rubs.
How to Bake Chicken Breast:
- Preheat Your Oven: Set it to 400°F (200°C) for optimal browning without overcooking.
- Prepare the Chicken: Pat the chicken dry, season or marinate it, and place it on a baking sheet or in a baking dish. Use parchment paper or foil for easy cleanup.
- Bake: Cook for 20–25 minutes, depending on the thickness of the breast. For thin pieces, reduce cooking time to avoid drying out.
- Check Doneness: Use a meat thermometer to ensure the internal temperature reaches 165°F (74°C).
- Rest: Let the chicken rest for 5 minutes after removing it from the oven to redistribute the juices.
Pro Tips for Baking:
- Use a Brine: Brining the chicken for 30 minutes before baking ensures juicy results.
- Don’t Overcrowd: Space the chicken pieces out on the baking sheet for even cooking.
- Add Moisture: Cover with foil or add a splash of broth or lemon juice for extra moisture during baking.
Grilling: Achieve Smoky, Charred Perfection
Why Grill?
Grilling adds a smoky, charred flavor that enhances the natural taste of chicken breast. It’s a healthier cooking method that doesn’t require additional fat, making it great for summer barbecues or outdoor meals.
How to Grill Chicken Breast:
- Prepare the Grill: Preheat your grill to medium-high heat (around 375–450°F). Oil the grates to prevent sticking.
- Prepare the Chicken: Marinate the chicken or coat it with oil and seasoning.
- Grill the Chicken: Place the chicken on the grill and cook for 4–5 minutes per side, flipping only once.
- Check Doneness: Ensure the internal temperature reaches 165°F (74°C) before removing it from the grill.
- Rest Before Serving: Let the chicken rest for 5 minutes to lock in the juices.
Pro Tips for Grilling:
- Pound the Chicken: Pound the chicken to an even thickness for uniform cooking.
- Indirect Heat for Thicker Pieces: If your chicken breasts are thick, use indirect heat (place chicken away from direct flames) to prevent burning the outside before the inside is cooked.
- Add Flavor Post-Grilling: Brush with BBQ sauce or drizzle with a citrus vinaigrette after grilling for a burst of flavor.
Pan-Searing: Crisp and Golden on the Outside, Tender Inside
Why Pan-Sear?
Pan-searing chicken breast creates a flavorful, golden-brown crust while keeping the interior moist and tender. This method is quick and perfect for smaller portions or when you want a rich, caramelized finish.
How to Pan-Sear Chicken Breast:
- Preheat the Pan: Use a heavy-bottomed skillet or cast-iron pan and heat it over medium-high heat. Add enough oil to lightly coat the bottom of the pan.
- Prepare the Chicken: Season the chicken generously and pat it dry to promote browning.
- Sear the Chicken: Place the chicken in the hot pan and cook without moving it for 4–5 minutes on one side, allowing a golden crust to form. Flip and cook for another 4–5 minutes.
- Check Doneness: Use a meat thermometer to ensure the internal temperature reaches 165°F (74°C).
- Rest and Serve: Let the chicken rest before slicing to preserve its juices.
Pro Tips for Pan-Searing:
- Butter Basting: Add a pat of butter, garlic, and fresh herbs to the pan during the last minute of cooking and spoon it over the chicken for enhanced flavor.
- Avoid Overcrowding: Cook in batches if necessary to maintain a hot pan temperature for proper searing.
- Deglaze for a Sauce: After cooking, deglaze the pan with wine, broth, or lemon juice to create a quick sauce using the flavorful browned bits.
Comparison of Cooking Techniques:
| Method | Pros | Cons | Best For |
|---|---|---|---|
| Baking | Even cooking, hands-off, easy cleanup | Less browning or caramelization | Meal prep, large batches |
| Grilling | Smoky flavor, charred exterior | Requires outdoor space, can dry out | Summer meals, bold flavors |
| Pan-Searing | Quick, crispy crust, rich flavor | Small batch, requires attention | Quick dinners, restaurant-style meals |
Choosing the right cooking technique for chicken breast depends on the desired flavor, texture, and convenience. Baking ensures juicy results with minimal effort, grilling adds a smoky and charred profile, and pan-searing delivers a golden, caramelized crust. Mastering these techniques will make chicken breast a versatile and reliable star of your meals, no matter the occasion.
Resting the Chicken for Juicy Results
Resting chicken breast after cooking is a crucial yet often overlooked step in achieving tender and juicy results. Resting allows the juices within the chicken to redistribute evenly, preventing them from escaping when the meat is sliced. By incorporating this simple step, you’ll elevate the texture and flavor of your chicken dishes, ensuring every bite is moist and delicious.
Why Resting Chicken is Essential
When chicken breast is cooked, the heat causes the juices to migrate toward the center of the meat. Cutting into it immediately after cooking releases these juices, leaving the chicken dry and less flavorful. Allowing the chicken to rest gives the juices time to redistribute throughout the meat, resulting in:
- Enhanced Juiciness: Retained moisture for tender and succulent bites.
- Better Texture: Resting helps the fibers relax, reducing toughness.
- More Flavor: Juices stay within the meat rather than pooling on the plate.
How Long Should You Rest Chicken Breast?
The amount of resting time depends on the size and thickness of the chicken breast:
- Small Chicken Breasts (thin cuts): Rest for about 3–5 minutes.
- Standard Chicken Breasts: Rest for 5–10 minutes.
- Stuffed or Thick-Cut Chicken Breasts: Rest for up to 10–15 minutes.
Pro Tip: Cover the chicken loosely with aluminum foil during resting to retain heat without trapping steam, which could soften any crispy exterior.
Best Practices for Resting Chicken Breast
- Use a Resting Rack:
- Place the cooked chicken on a wire rack set over a plate or tray. This prevents the chicken from sitting in its own juices, maintaining any crispness.
- Tent with Foil:
- Create a loose tent with aluminum foil to keep the chicken warm while it rests. Avoid wrapping it tightly, as this can create steam and affect the texture.
- Timing is Key:
- Avoid resting for too long, as the chicken may cool down. If it gets cold, a quick reheat in the oven or microwave can bring it back up to serving temperature without drying it out.
How to Know If the Chicken Has Rested Enough
Resting time can vary depending on the cooking method, but here’s how to check:
- Juice Test: When sliced, the chicken should release a small amount of clear or slightly golden juice, not a flood of liquid.
- Temperature Check: Use a meat thermometer to confirm the chicken is still warm, around 145–155°F, after resting. This ensures it’s ready to serve at the ideal temperature.
Benefits Beyond Juiciness
Resting chicken breast doesn’t just ensure juiciness—it also improves the overall presentation and dining experience:
- Neater Slices: Rested chicken holds its shape better when sliced, resulting in cleaner cuts for serving.
- Even Flavor Distribution: Juices that have redistributed carry flavor throughout the meat, enhancing every bite.
Common Mistakes to Avoid When Resting Chicken Breast
- Skipping the Step: Cutting into the chicken immediately after cooking is the most common mistake, leading to dry results.
- Over-Resting: Leaving the chicken for too long can cause it to cool down and lose its appeal.
- Trapping Steam: Wrapping chicken tightly in foil during resting creates steam, which can soften any crispy exterior.
How Resting Fits into Cooking Techniques
Resting is a universal step across cooking methods:
- Baking: Resting baked chicken prevents juices from spilling out, especially when cooking with marinades.
- Grilling: After grilling, resting ensures the smoky flavors remain locked in while the chicken stays tender.
- Pan-Searing: Resting pan-seared chicken keeps its crispy exterior intact while retaining moisture inside.
The Science Behind Resting Chicken Breast
Resting works by allowing the muscle fibers in the chicken to relax after being contracted by heat during cooking. This relaxation enables the juices to move evenly throughout the meat, rather than being concentrated in the center. Cutting into chicken without resting interrupts this process, causing the juices to flow out and leave the meat dry.
Resting chicken breast is the final but vital step in preparing juicy, flavorful dishes. By allowing the meat to rest for a few minutes after cooking, you lock in moisture, enhance texture, and improve the overall flavor. Whether you’re grilling, baking, or pan-searing, don’t rush to serve—give your chicken the rest it deserves for truly mouthwatering results!
Using a Meat Thermometer for Perfect Doneness
Achieving perfectly cooked chicken breast every time can feel like a challenge—undercooking poses health risks, while overcooking leaves the meat dry and tough. A meat thermometer is the ultimate tool for precise cooking, helping you avoid these issues while ensuring safe and delicious results. Here’s everything you need to know about using a meat thermometer to master the art of cooking chicken breast.
Why Use a Meat Thermometer?
- Accuracy: Cooking times can vary based on chicken thickness, cooking method, and oven or stovetop inconsistencies. A thermometer provides precise results.
- Safety: Chicken breast must reach an internal temperature of 165°F (74°C) to eliminate harmful bacteria like salmonella.
- Juiciness: Prevent overcooking by pulling the chicken off the heat at just the right time.
- Consistency: Achieve repeatable results, whether you’re baking, grilling, or pan-searing.
Types of Meat Thermometers
- Instant-Read Thermometers:
- Ideal for quick temperature checks.
- Insert into the thickest part of the chicken to get an immediate reading.
- Probe Thermometers:
- Designed for continuous monitoring.
- Insert the probe into the chicken and leave it in while it cooks. The display shows the temperature in real-time.
- Digital Thermometers:
- Provide fast and accurate readings with an easy-to-read display.
- Some come with advanced features like alarms when the target temperature is reached.
- Analog Thermometers:
- Basic and reliable, but slower than digital options.
- Requires manual reading and can be less precise.
How to Use a Meat Thermometer for Chicken Breast
- Prepare the Chicken:
- Season or marinate the chicken breast as desired and cook it using your preferred method (baking, grilling, pan-searing).
- Insert the Thermometer:
- Position Matters: Insert the thermometer into the thickest part of the chicken breast, avoiding bone or large pockets of fat that can give inaccurate readings.
- Angle the Probe: Insert it at a slight angle for better depth and accuracy.
- Check the Temperature:
- The target internal temperature for cooked chicken breast is 165°F (74°C).
- Remove the chicken from heat when the thermometer reads 160°F (71°C)—carryover cooking will bring it to the perfect 165°F as it rests.
- Clean the Thermometer:
- Wash the thermometer thoroughly with hot, soapy water after use to prevent cross-contamination.
Tips for Using a Meat Thermometer Effectively
- Calibrate Your Thermometer: Test your thermometer’s accuracy by placing it in boiling water (should read 212°F or 100°C at sea level). Recalibrate if needed.
- Check in Multiple Spots: For thicker chicken breasts, take readings in a couple of areas to ensure even cooking.
- Avoid Over-Insertion: Insert only the tip of the probe into the thickest part for the most accurate reading.
- Keep the Thermometer Handy: Store it in a convenient location near your cooking space for easy access.
Using a Thermometer Across Cooking Methods
- Baking: Insert the thermometer during the last 5–10 minutes of cooking to avoid opening the oven repeatedly.
- Grilling: Check the temperature quickly to minimize heat loss. For thick cuts, consider a leave-in probe thermometer.
- Pan-Searing: Use an instant-read thermometer after removing the chicken from the pan, as high surface heat can affect the reading.
- Sous Vide: Verify doneness even if the water bath is set to the desired temperature, especially for thick cuts.
Common Mistakes to Avoid
- Skipping the Test Spot: Don’t rely on just one spot—temperature can vary across the chicken breast.
- Cooking by Time Alone: Times are estimates and can lead to undercooked or overcooked results without a thermometer.
- Neglecting Carryover Cooking: Chicken continues to cook after being removed from heat. Remove it at 160°F to avoid overcooking.
- Improper Placement: Ensure the thermometer probe isn’t touching the pan, grill grates, or bones, which can skew readings.
Benefits of Perfect Doneness
- Safe to Eat: Proper cooking eliminates harmful bacteria while keeping the chicken safe and delicious.
- Enhanced Juiciness: Removing the chicken at the right temperature ensures it’s moist, tender, and flavorful.
- Consistent Results: A thermometer takes the guesswork out of cooking, delivering professional-quality results every time.
Bonus Tip: Investing in a Quality Thermometer
While budget options can work, investing in a high-quality digital meat thermometer saves time, improves accuracy, and lasts longer. Features like backlit screens, quick readings, and dual probes (for multiple pieces of meat) can make a significant difference in your cooking experience.
Using a meat thermometer is a simple yet transformative step for cooking chicken breast to perfection. By monitoring the internal temperature with precision, you’ll not only ensure safety but also elevate the texture and flavor of your meals. Make the thermometer an essential part of your kitchen toolkit, and say goodbye to undercooked or overcooked chicken forever!
Conclusion:
Chicken breast is undoubtedly one of the most versatile, nutritious, and easy-to-cook proteins available, making it the perfect choice for a wide variety of dinner recipes. Whether you’re seeking a quick weeknight meal, a healthy option, or something with bold flavors, chicken breast can be transformed into countless delicious dishes. From simple baked recipes to more adventurous grilling and pan-searing techniques, the possibilities are endless.
By incorporating different cooking methods and creative seasonings, you can elevate the humble chicken breast into a flavorful and satisfying dinner. Baking offers convenience and even cooking, grilling brings out smoky, charred flavors, and pan-searing provides a crispy, golden crust with tender insides. Pairing these techniques with a variety of herbs, marinades, or sauces can lead to endless combinations that keep mealtime exciting.
Resting the chicken after cooking and using a meat thermometer to ensure perfect doneness are crucial steps to achieving juicy, tender results. Additionally, exploring different sides, like roasted vegetables, grains, or salads, can complement your chicken breast dishes and create a well-rounded meal.
Are you ready to try this recipe?
There are no reviews yet. Be the first one to write one.